")
A “Not So Small” Success!

As I mentioned last week, my husband has been gone on a two week training session… His last day is today, and (since this particular training is only a few hours drive away) he will be home tonight!
When he left I decided that, in addition to just maintaining (keeping up with the regular housework and homeschooling), I was going to try and get a couple projects completed that I’ve been wanting to get done for a long time.
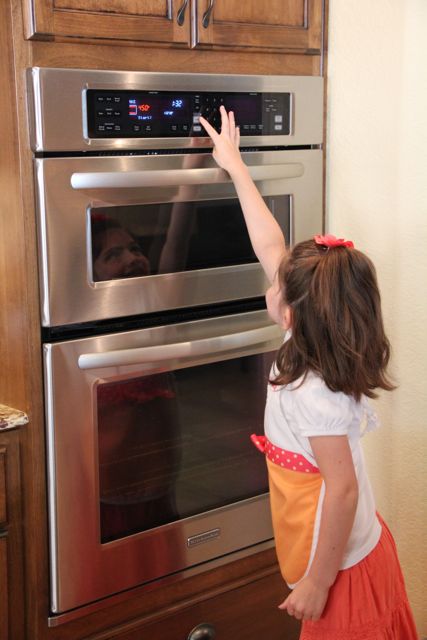
I started with having my boys bring all the tubs and bags of clothing that were in the little storage area above their closet/bathroom to my bedroom. It was a mess! Big boys clothes was mixed in with little boy clothes. Shoes were stored with the same size clothing that the last child happened to wear them with. I even found some girl clothes mixed in with boy clothes. I had to take everything out and re-sort through it all… At least, with the training (unlike the unpredictable fire assignments), I didn’t have to worry about my husband coming home early to his side of the room taken over by clothing and looking like this (and much worse at times):
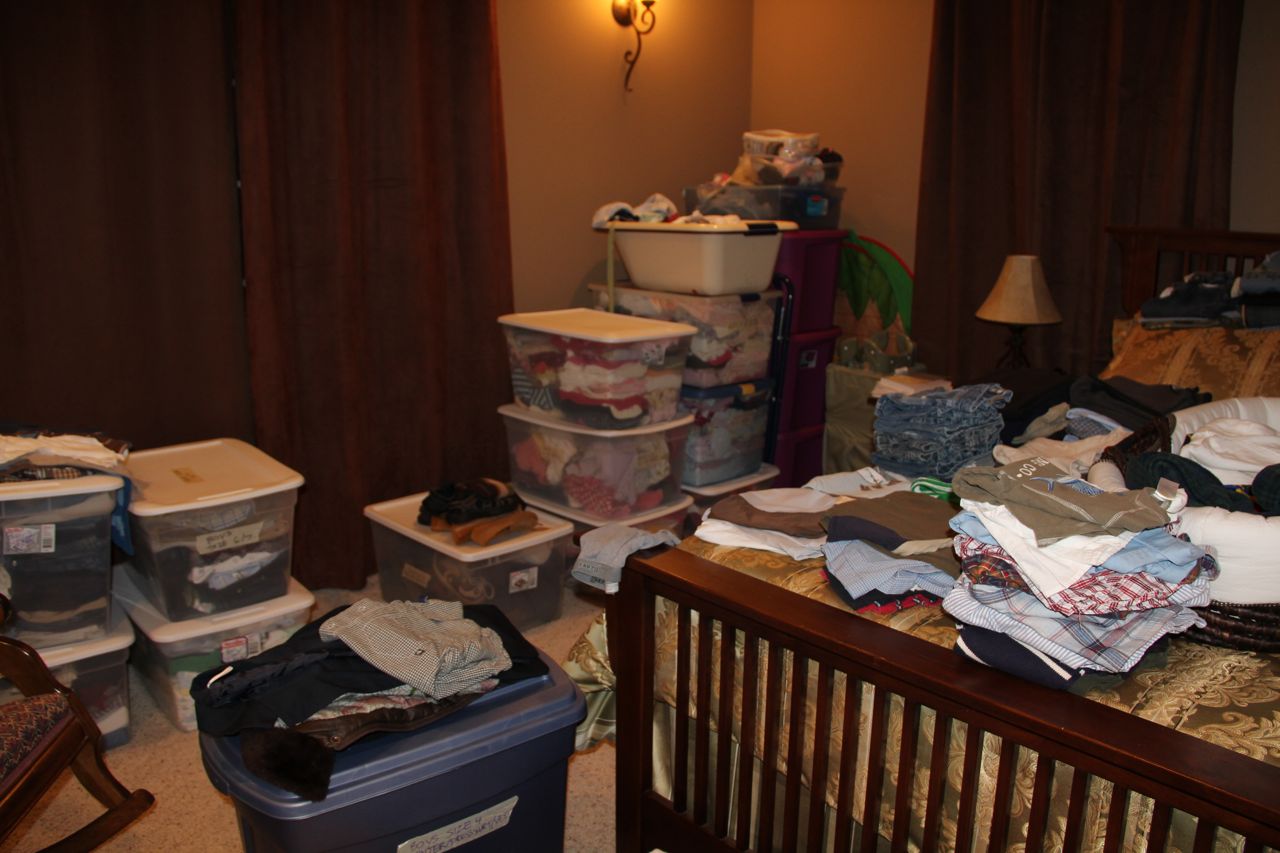
He arrives home tonight though, and I was able to finish in time! I reduced the quantity of clothing down to one storage tote per size (one for boys and one for girls) and put the shoes all in smaller separate totes. We ended up taking a carload full of stuff to donate as well.
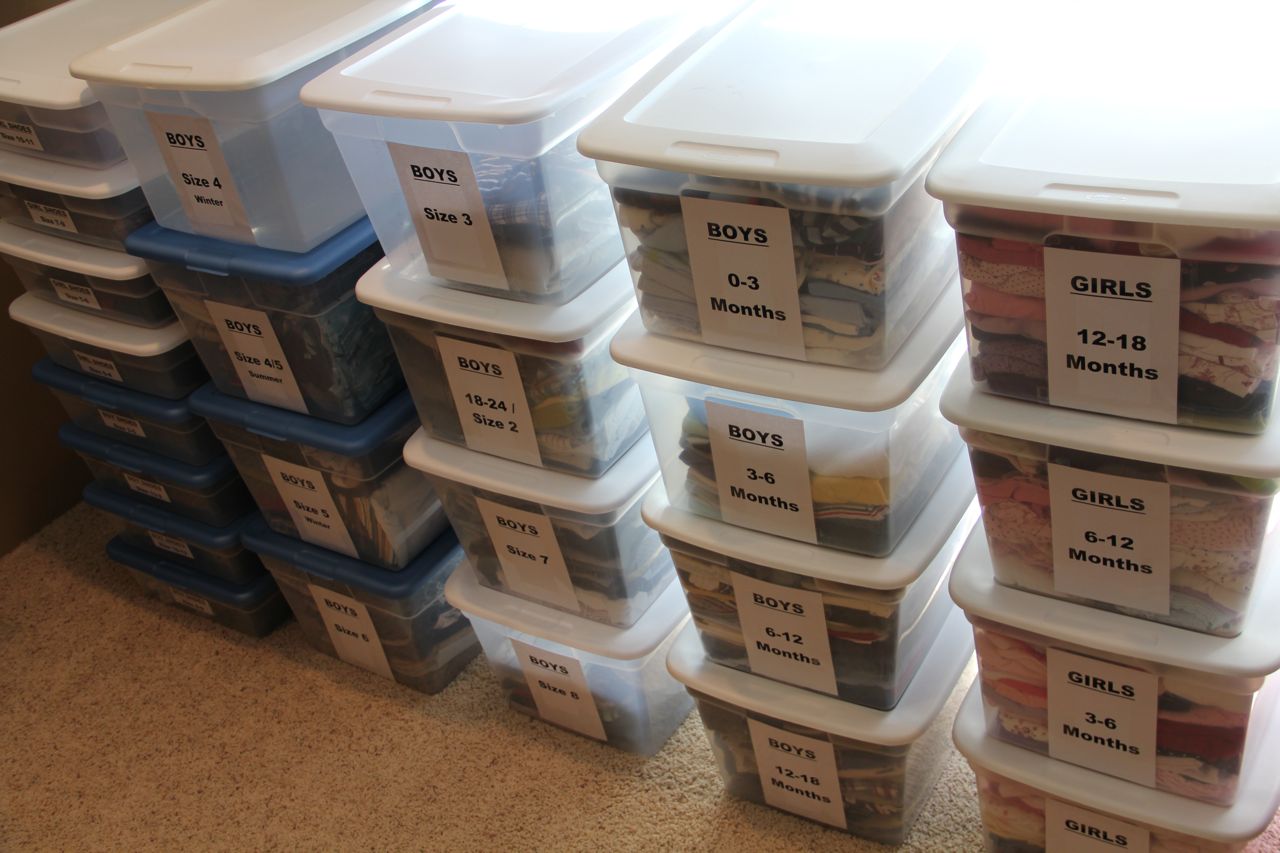
I did end up keeping two totes of size 4 boy and size 18/24/2T girls since those are the sizes that Snuggles and Rose are currently wearing, and I will reduce the quantity over the next few months, and only store what fits in the tote after they outgrown those sizes… An almost 2 year old girl doesn’t really need 45+ complete skirt and dress outfits now, does she?!


I printed labels for each tote in word, printing two to a page (all 8 on one page for the shoes), and then attached them to the totes with some packing tape. I am really happy with how it all turned out. Now if I could just figure out a way to get them all in to that great new storage area above our dining room… Perhaps I should get Hubby an extension later (and a pulley!) for our anniversary next weekend on the 2nd! 😉

Novena to Saint Thérèse ~ Day Two

Novena to Saint Thérèse
O St. Thérèse of the Child Jesus, who during your short life on earth became a mirror of angelic purity, of love strong as death, and of wholehearted abandonment to God, now that you rejoice in the reward of your virtues, cast a glance of pity on me as I leave all things in your hands. Make my troubles your own, speak a word for me to Our Lady Immaculate, whose flower of special love you were — to that Queen of Heaven “who smiled on you at the dawn of life” Beg her powerful intercession the grace I yearn for so ardently at this moment…and that she join with it a blessing that may strengthen me during life, defend me at the hour of death, and lead me straight on to a happy eternity. Amen.
O God, who did inflame with the Spirit of Love, the soul of your servant Thérèse of the Child Jesus, grant that we also may love you and make you much loved. Amen.
DAY TWO
Almighty God, giver of all good gifts, who did will that Blessed Thérèse, being watered by the heavenly dew of your guiding grace, should bloom in Carmel with the beauty of virginity and patience in suffering, grant that I your servant may go forward in the order of her sweetness an may be found worthy to become a devoted and loyal follower of Christ. Amen.
St. Thérèse of the Child Jesus, pray for us.
Novena to Saint Thérèse

The feast day of St. Thérèse is coming up! Her feast is celebrated on the 1st of October (and on the 3rd of October on the Traditional Calendar). The novena for her intercession can be said anytime, but we will be praying this particular Nine Day Novena to St. Therese in anticipation of her feast, ending on the eve of the Feast (Sept 30th or Oct 2nd). We will then start another Novena to St. Therese which begins on her feast day! I plan to schedule the prayers to post each day, just like last year.
“Many people {including myself !} report unexpectedly finding or being given a literal rose or roses (or smelling the perfume of roses) after praying to St. Thérèse, who said on her deathbed, ‘After my death, I will let fall a shower of roses. I will spend my Heaven doing good upon earth. I will raise up a mighty host of little saints. My mission is to make God loved…'” Quoted from Fisheaters
O St. Thérèse of the Child Jesus, who during your short life on earth became a mirror of angelic purity, of love strong as death, and of wholehearted abandonment to God, now that you rejoice in the reward of your virtues, cast a glance of pity on me as I leave all things in your hands. Make my troubles your own, speak a word for me to Our Lady Immaculate, whose flower of special love you were — to that Queen of Heaven “who smiled on you at the dawn of life” Beg her powerful intercession the grace I yearn for so ardently at this moment…and that she join with it a blessing that may strengthen me during life, defend me at the hour of death, and lead me straight on to a happy eternity. Amen.
O God, who did inflame with the Spirit of Love, the soul of your servant Thérèse of the Child Jesus, grant that we also may love you and make you much loved. Amen.
DAY ONE
O Thérèse of the Child Jesus, well beloved and full of charity, in union with you, I reverently adore the majesty of God, and since I rejoice with exceeding joy in the singular gifts of grace bestowed upon you during your life, and your gifts of glory after death, I give Him deepest thanks for them; I beseech you with all my heart’s devotion to be pleased to obtain for me (…mention request here). But if what I ask of you so earnestly does not tend to the glory of God and the greater good of my soul, do you, I pray, obtain for me that which is more profitable to both these ends. Amen.
St. Thérèse of the Child Jesus, pray for us.
*Another beautiful novena to St. Therese is the Rose Novena, which was the very first Novena I prayed to her, and you can see it on the right side of my blog header. I also have a printable prayer card here.
You can also sign up for daily email reminders here.
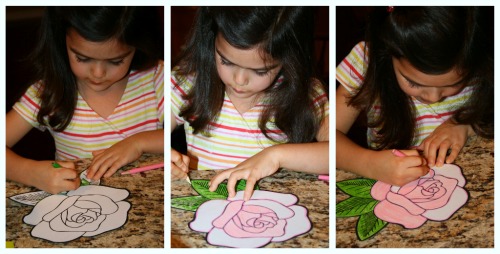
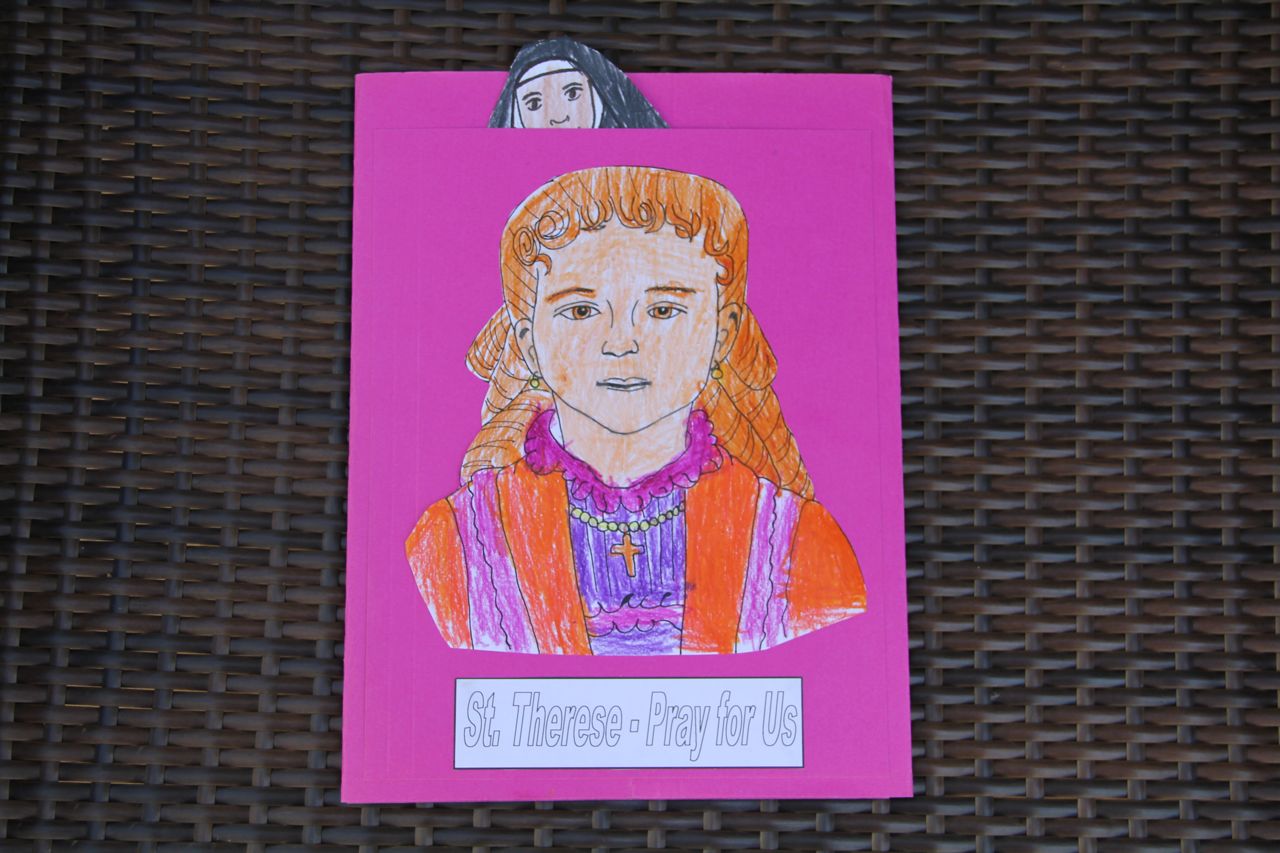
St. Therese Lap Book
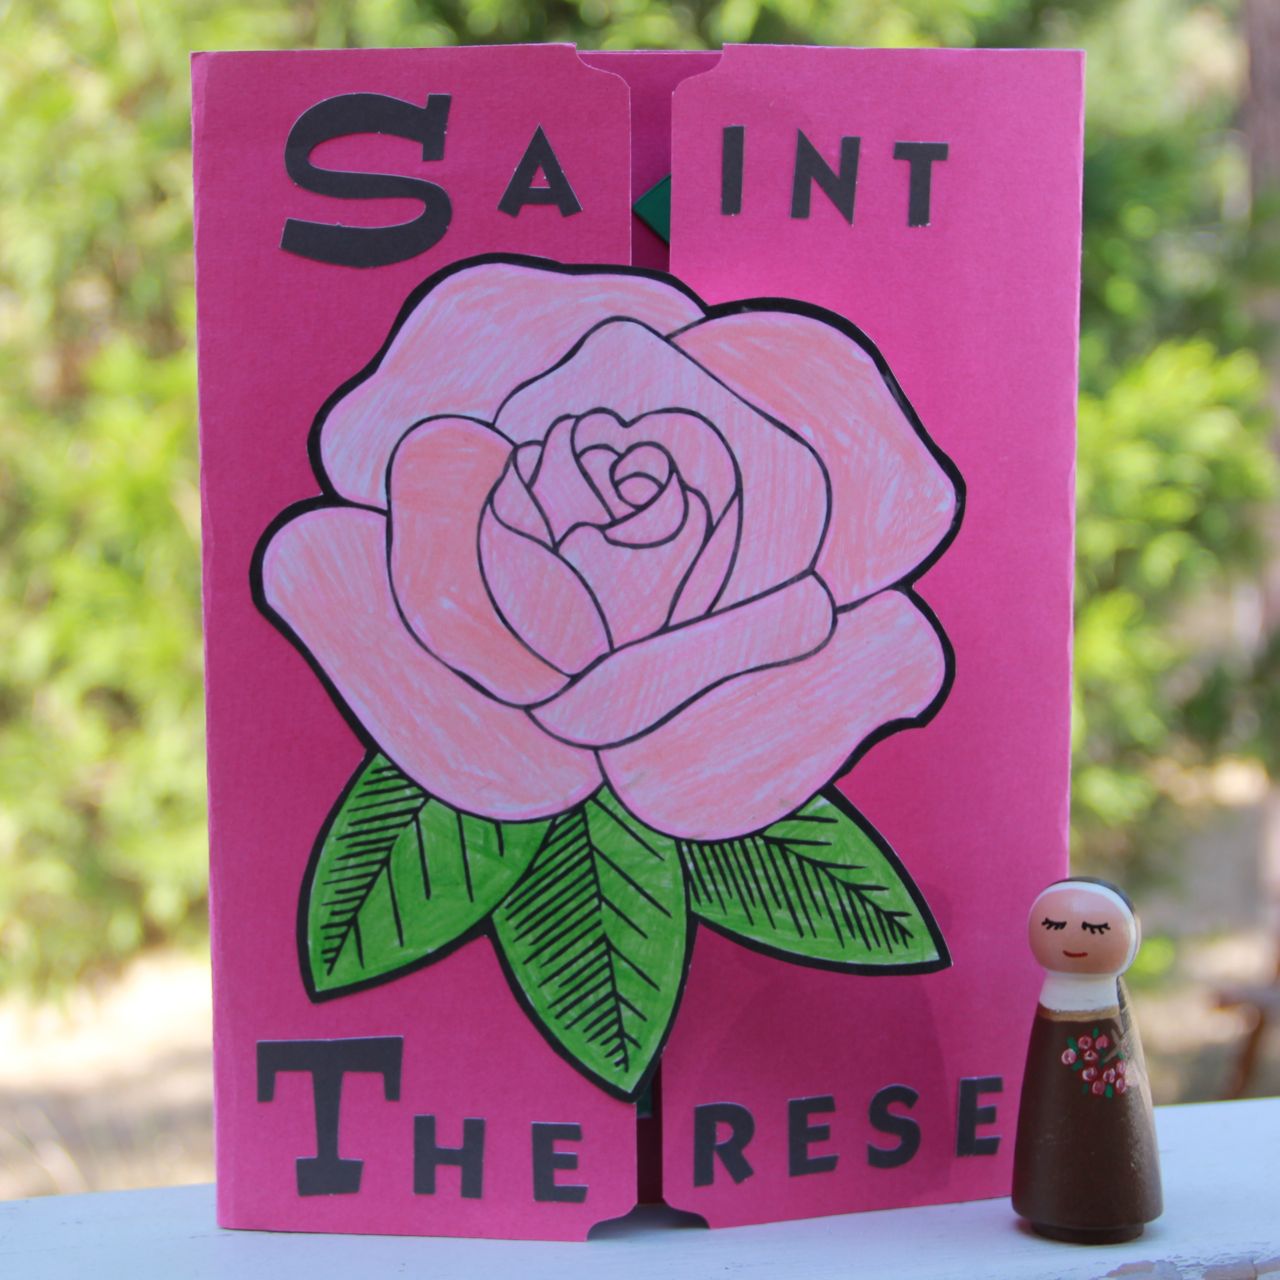
Last year I posted pictures from my oldest daughters St. Therese Lap Book. With the feast of St. Therese coming up soon, I thought I would share pictures from Chiquita’s St. Therese Lap Book, which she recently completed. These Lap Books were made using the excellent St. Therese the Little Flower Faith Folder created by Holy Learning (previously Faith Folders for Catholics)!
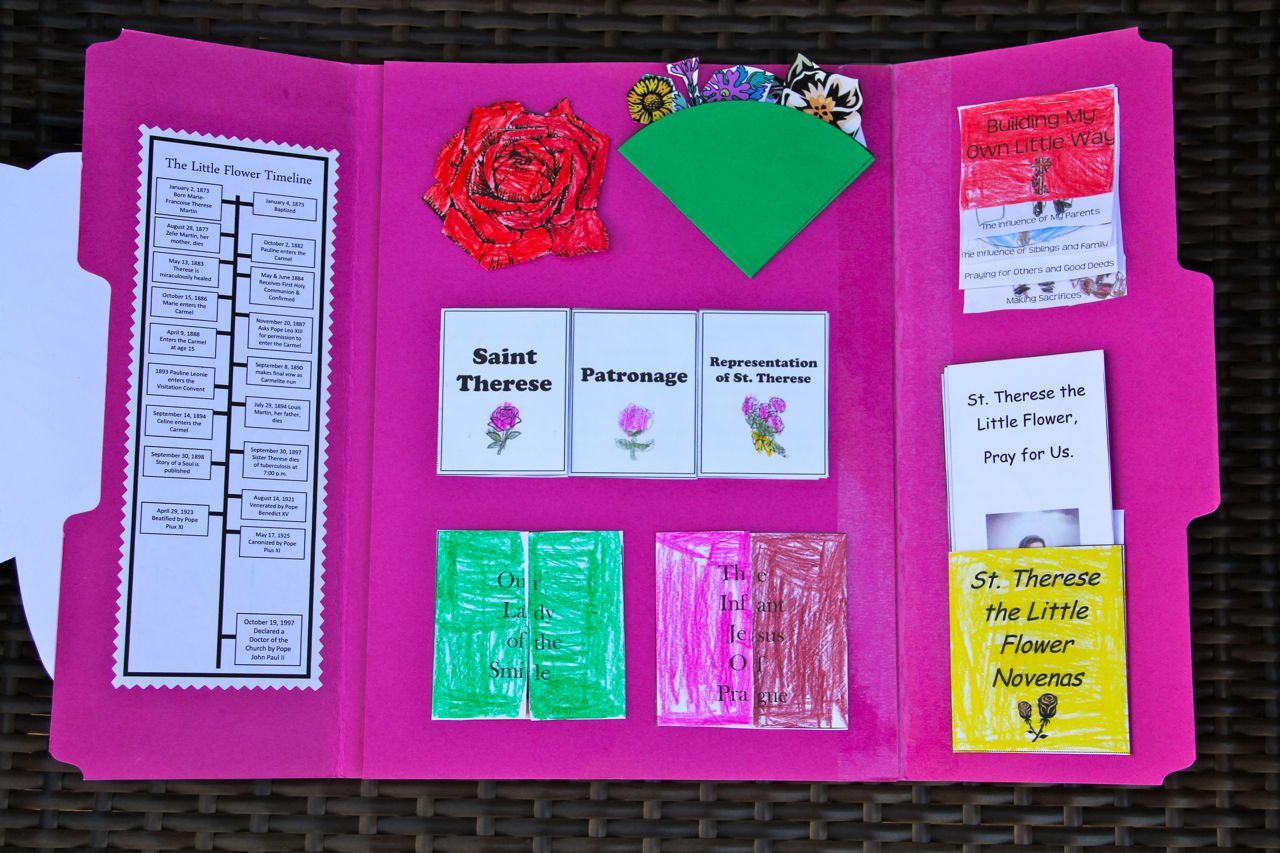
- “The Little Flower Timeline”
- Words of the Little Flower” Rose Shape Book
- “Sacrifices for Jesus” Cone Pouch
- “St. Therese Facts” Triple-Decker Book Set
- “Our Lady of the Smile” Open the Doors Book
- “The Infant Jesus of Prague” Open the Doors Book
- “Building My Own Little Way” Graduated Pages Book
- “St. Therese the Little Flower Novenas” Pocket and Prayer Cards Set
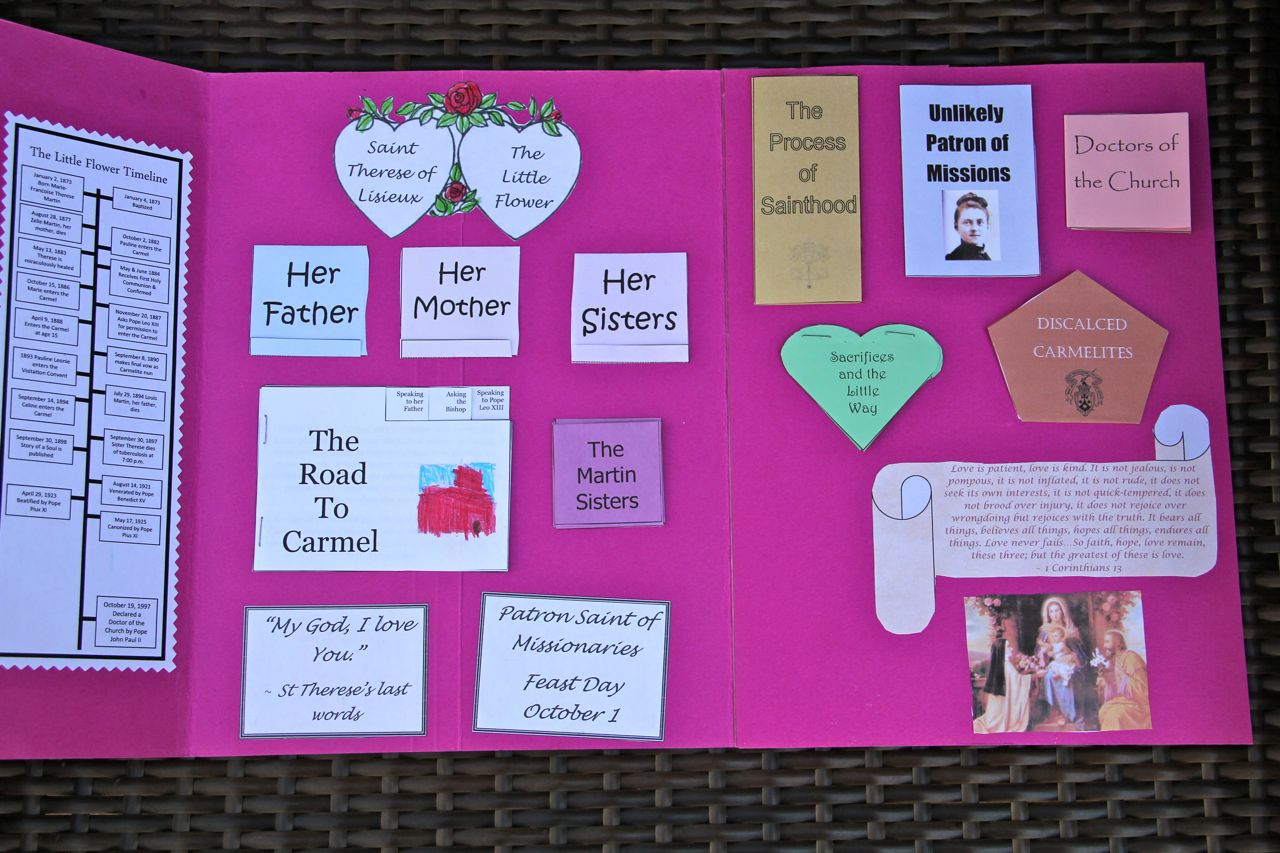
Left Flap:
- “The Little Flower Timeline”
Center:
- “The Martin Family” Open-Up Book Set
- “The Road to Carmel” Pick-a-Tab Book
- “The Martin Sisters” Square Fold-Out Book
- “The Process of Sainthood” Multiple Flaps Book
- “Unlikely Patron of Missions” Rectangle Book
- “Doctors of the Church” Square Fold-Up Book
- “Sacrifices and the Little Way” Heart Shape Book
- “Discalced Carmelites” Pentagon Book

Shower of Roses Online Little Flowers Girls’ Club
Over the past few years I have had a number of friends suggest that I try and come up with a way for little girls all over, that don’t have a group of their own, to “join” my Little Flowers Girl’s Club group. Last year I thought about attempting this, but, with finishing up our major remodel and getting a late start for the year, I just wasn’t able to pull it off. This year I am a little more prepared, and think that it might doable. So, here are my thoughts…
Be a Little Flower – I will share my “plans” for Wreath IV in advance (ideally by next week, if I can finish them by then), and any moms/daughters that would like to “join” us are more than welcome! Whether you would like to do everything that we do at our meetings (Prayer, Coloring Page, Craft, Notebook Page, Lesson, Lap Book Activity for Wreath IV only, and Snack) or just a few of those things, you are more than welcome to participate at home. It will be up to each mom to purchase the craft supplies and print the various documents/coloring sheets for your own daughters – I’ll provide all my documents and any links.
Note: My group will be completing Wreath IV, which focuses on the Gifts of the Holy Spirit. If you’d like to start with any of the other Wreath’s you can find all my past plans in the archives, as well as separated by the labels for Wreath I, Wreath II, Wreath III and Wreath IV. Our past meetings can be modified in whichever way works best for you – you don’t need to do exactly the same thing in order to participate in this online group.
Share Your Work – I will post a link up after each of our meetings is held for you to add a link to a blog post with pictures from your own meeting. It would be great fun for the girls to browse through the various blog posts and see all the pictures. (There are only 7 meetings for Wreath IV and we will be having our monthly meetings in Sep, Oct, Nov, early Dec, Mar, Apr, May, and a Tea Party to finish the year, date TBA. For those that are doing this at home with just your own girls, perhaps a Mom/Daughter outing to a local Tea House would be a fun way to finish the year!)
Note: I will post the link up along with the post from our local meeting, leaving it “open” for a two week period to allow everyone time to add their links. Since Wreath IV only has 7 meetings (compared to 9 in the other three wreaths, we will be taking off Jan and Feb… I am due January 1st after all, so this will work out perfectly!
Develop Friendships – To encourage an even greater sense of connection to the overall “group,” I would be willing to coordinate pen-pals for any of the girls that are interested. Once I have a list of all the girls – both from my own local group and those that join us online – I will try and match those that are closest in age together, as well as which Wreath they are completing if possible.
Materials/Supplies – The girls in my group each have a Hot Pink Binder to store their Notebook Pages (these were purchased at WalMart for around $2 each), as well as homemade Tote Bags and T-Shirts. These, of course, are all optional. I highly suggest the purchase of a Patch for the Wreath you choose, Blue Sash, and Member’s Guide for each girl. You can purchase these from either the publisher, Ecce Homo Press, or from Sacred Heart Books and Gifts. My girls also have the supplemental Art & Activity Books and Memory Verse CDs as well.
I’d love any feedback or ideas from any of you that might be interested in something like this for your daughters!
In the meantime, I had better get back to finishing the plans for this year… Our first meeting will be next week!
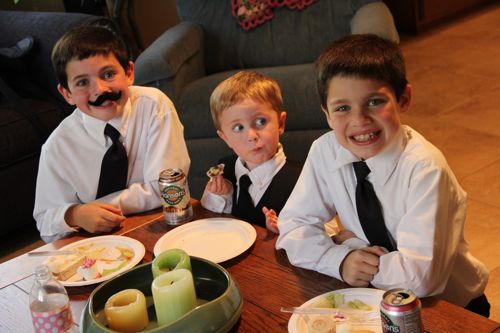
Funny Faces
My friend Amy’s daughter Lily is hosting a photo contest on her blog for “Funny Faces.” Here is my entry, a picture of my three boys (aka: servers on break) taken at their sister’s Birthday ParTEA:
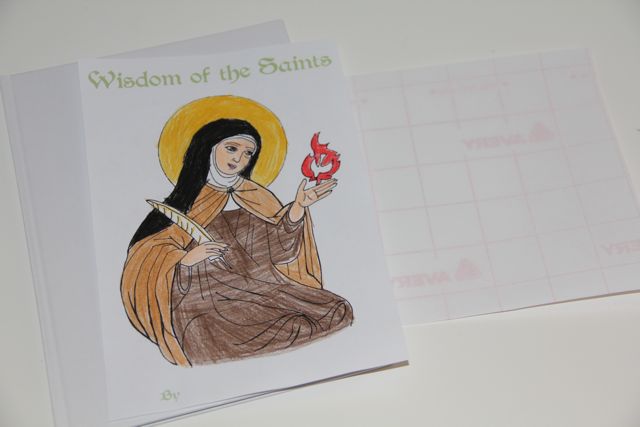
“Wisdom of the Saints” Journal

This year my Little Flowers Girls’ Club will be moving on to Wreath IV and studying the Seven Gifts of the Holy Spirit! Our first meeting, which will be held next week, will be based on the gift of Wisdom and St. Teresa of Avila. Since one of the symbols for St. Teresa of Avila is a “Book,” I came up with a “Wisdom of the Saints” Journal for the girls to make as our craft, in which they can record their favorite quotes from the saints!
This craft would also tie in nicely for the 6th meeting of Wreath II based on the virtue of Wisdom and St. Teresa Benedicta (Edith Stein), substituting the image of St. Teresa of Avila with a coloring page of St. Teresa Benedicta. It would also be a great craft for any children, not just Little Flowers, to make for the actual feast of St. Teresa of Avila, which is coming up next month on October 15th!
Craft: “Wisdom of the Saints” Journal
Supplies:
Blank Book (I purchased these from Rainbow Resource)
Coloring Page of St. Teresa of Avila from Waltzing Matilda
Colored Pencils, Crayons or Markers
Glue Stick
Self-Adhesive Laminating Sheets
Directions:
Re-Size Coloring Page to fit on the front of your blank book or notebook. Add “Wisdom of the Saints” to the top of the page and “By (little flower name)” to the bottom. (I will have these pre-printed for our meeting, with each of the girls names already printed on the bottom. I was able to make these quickly in Word.)
Have each girl color the image and glue to the front cover of their book. (My oldest daughter colored the sample page.)
Trim laminating sheet to 1/4-1/2″ past each side of the book, cutting the two outside corners at an angle, so that you can wrap it around the edges to secure. (I was able to cut the 9×12 sheets in half, using one sheet for two books.)
Instruct the girls to fill the book with their favorite saint quotes, the “Wisdom of the Saints!”
St. Teresa of Avila, pray for us!
P.S. Does anyone happen to have the pdf saved from the St. Teresa of Avila paper doll I have linked to in the past? We’ve made it a few times, but I can’t seem to find the file on my computer (I think it might not have been transferred over from my old computer), nor have I been able to find it again online, and would like to print some out for our meeting. If so, could you please email me a copy?
A Red, White and Blue History Tour!
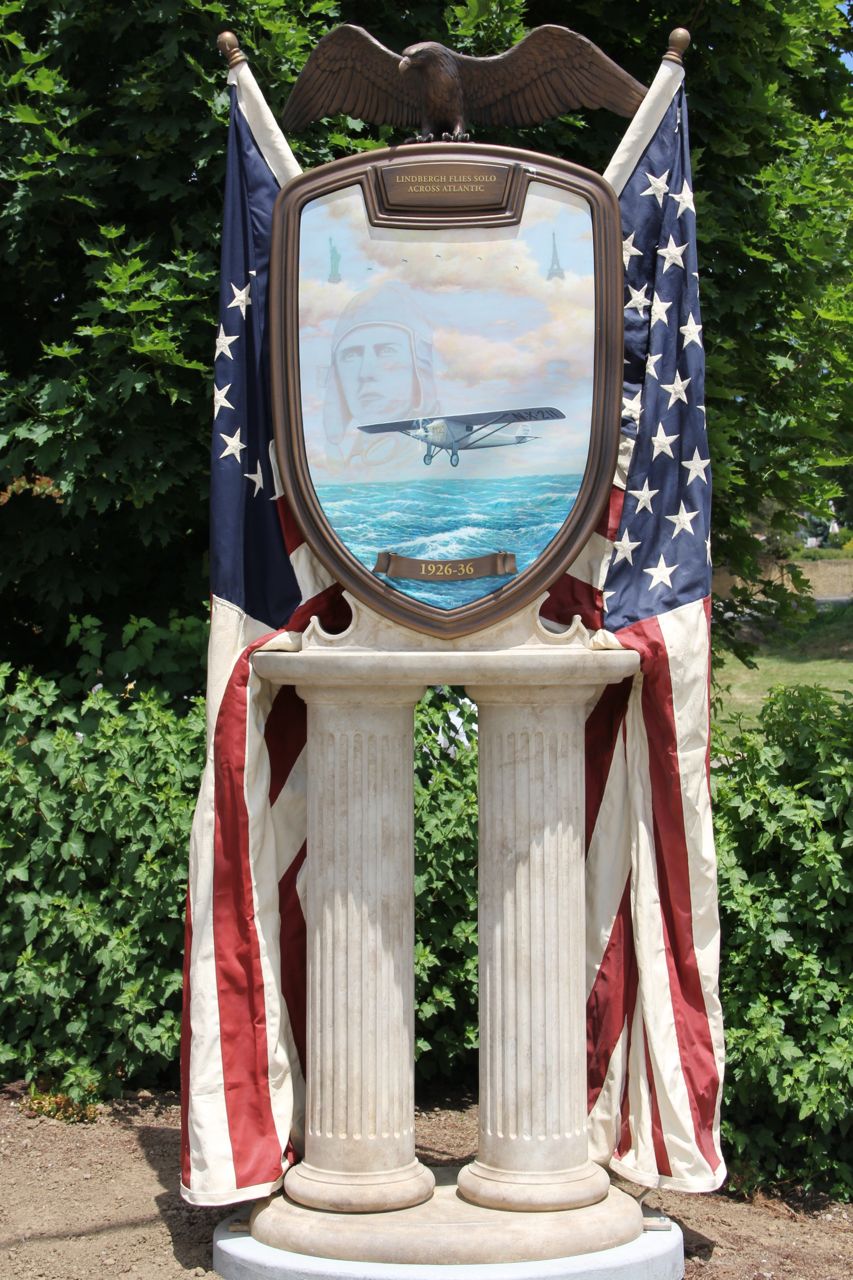
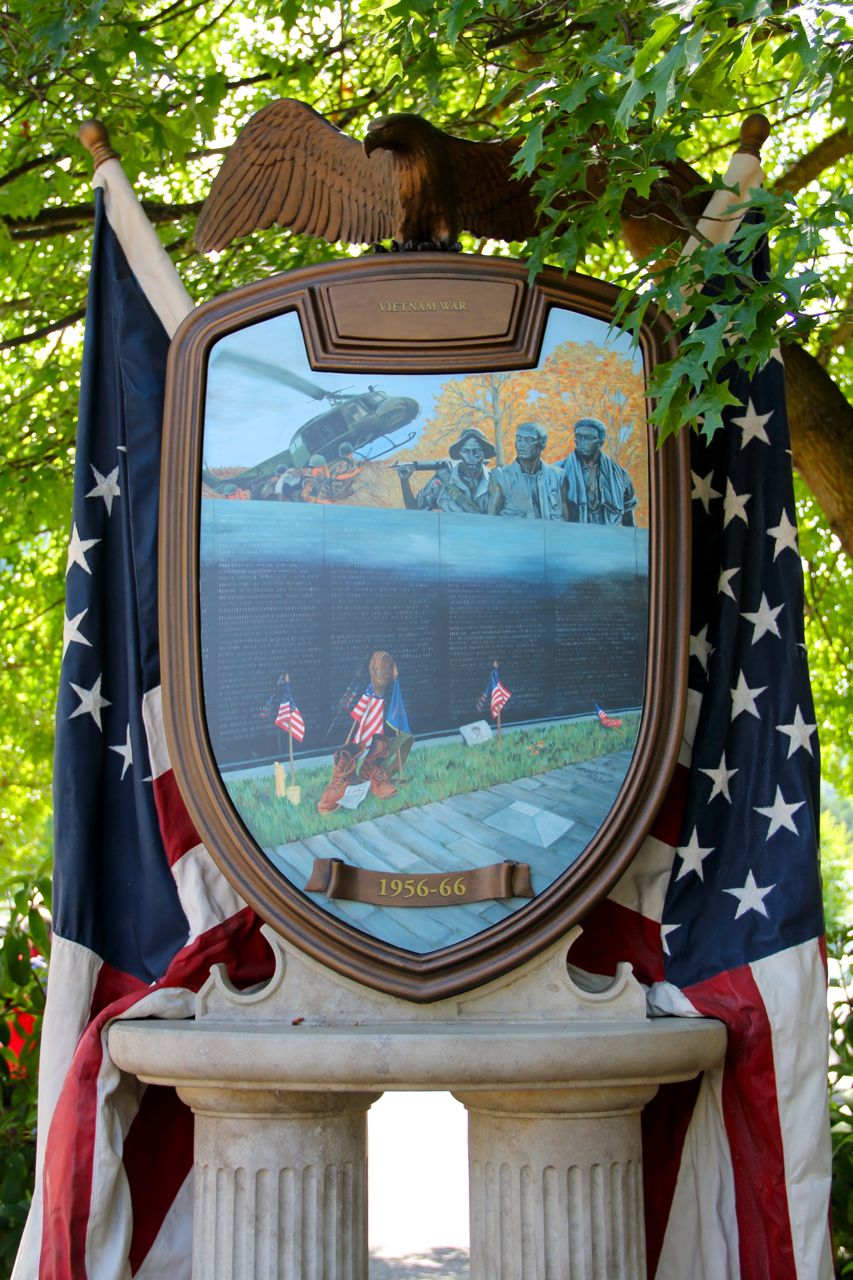
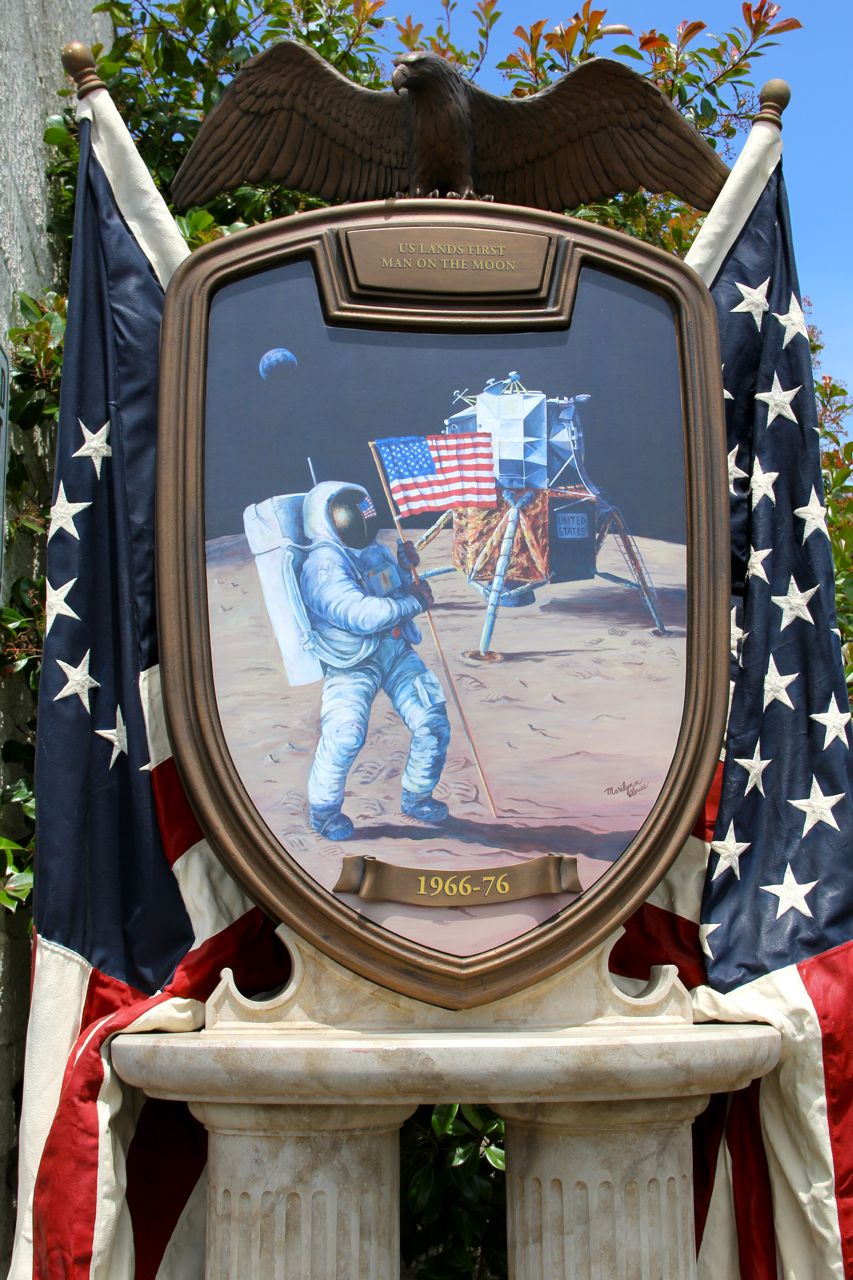
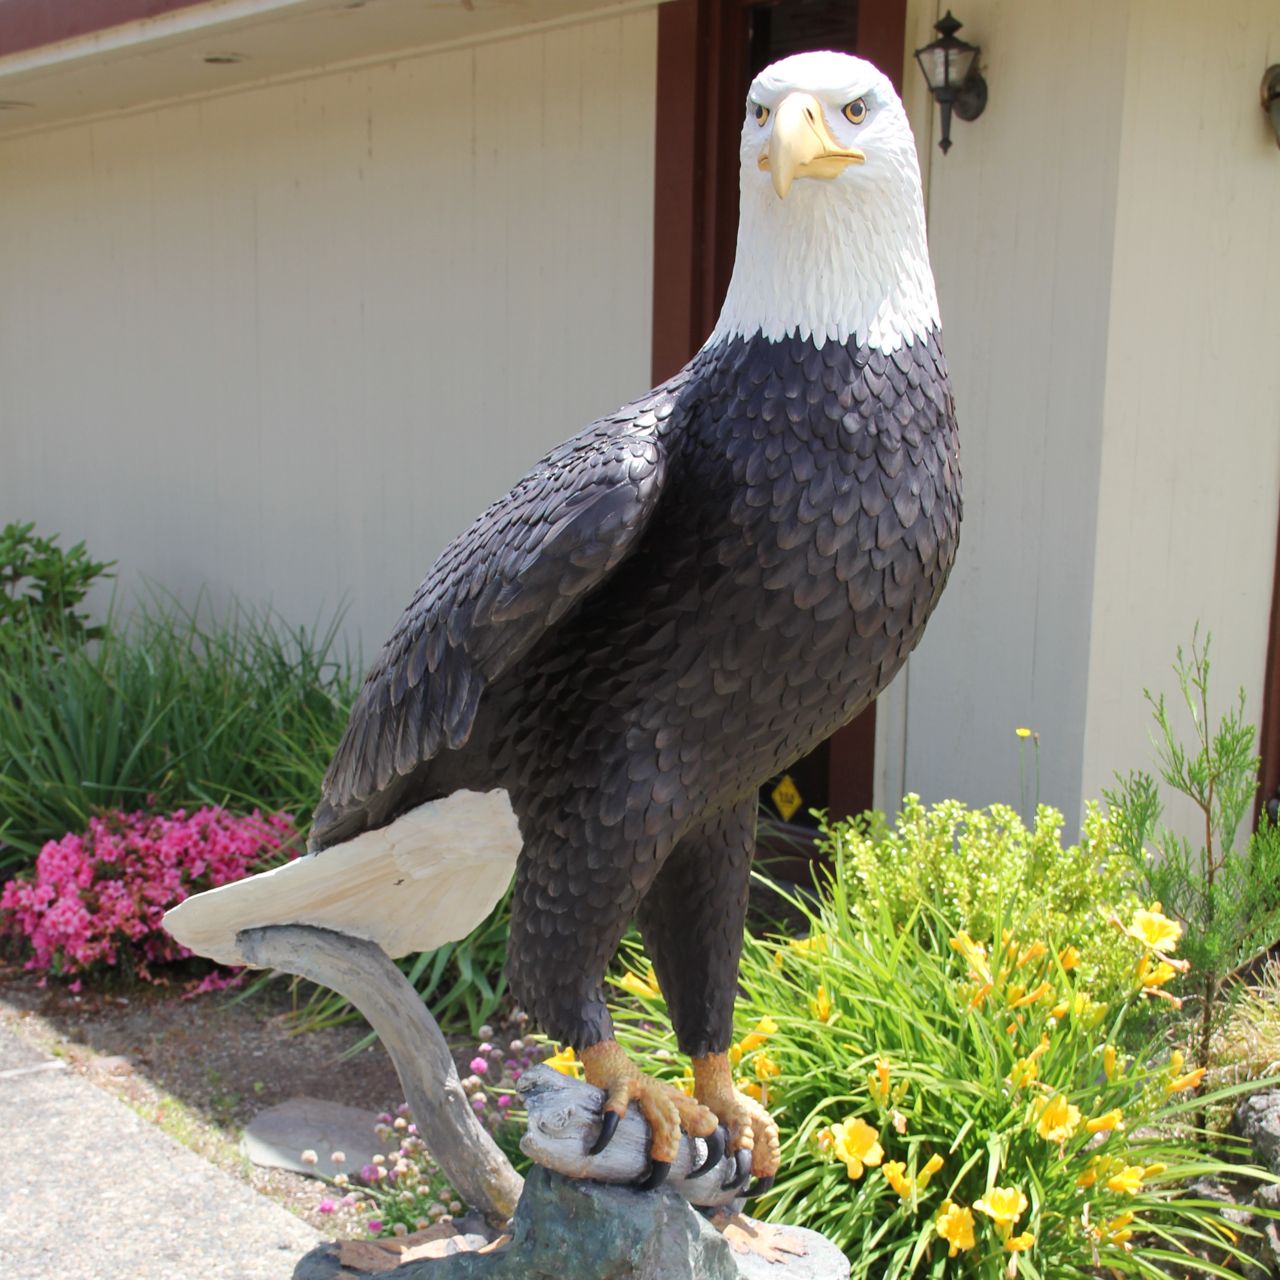
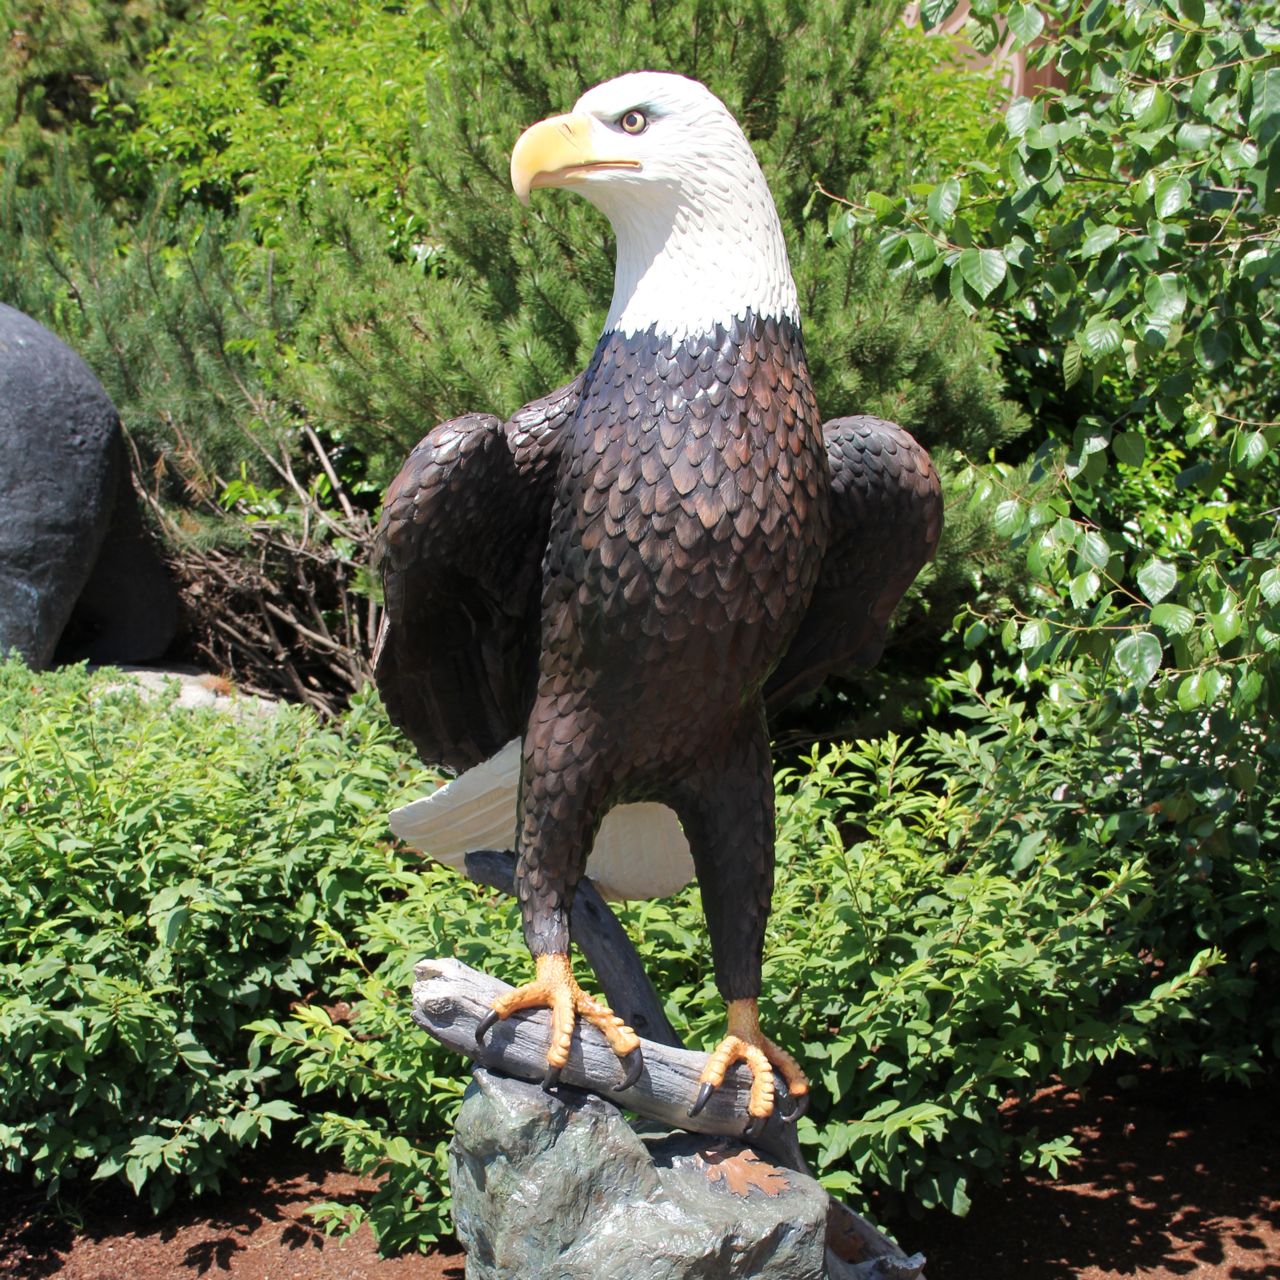
Last fall/winter we had a “Bear Attack” (I meant to post pictures and never did) in our little town… This summer the eagles landed, and we enjoyed “An Old Fashioned Celebration of America!” Placed along our main streets, and in the shopping center, were 23 shields featuring significant highlights of the first 23 decades of American history. Unfortunately I didn’t take pictures of all the monuments as I would have liked to, while they were still displayed, but here are a few pictures that I did take one afternoon while we were walking around town:

Each monument is comprised of two marble columns that hold a bronze shield that is between two U.S. flags, one with 13 stars for the original 13 colonies and the other with 50 stars representing the 50 states of the Union. On the top of each shield is the national bird, a Bald Eagle.
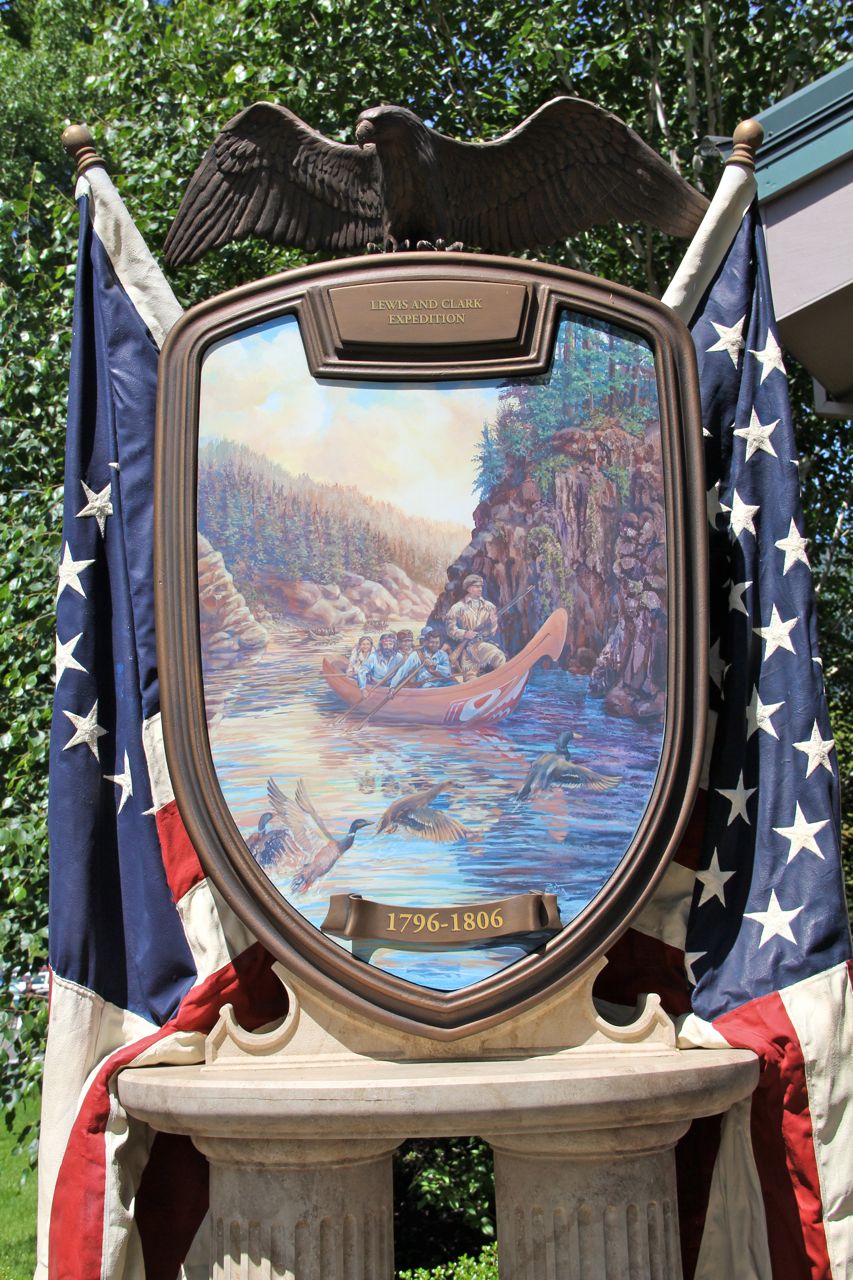
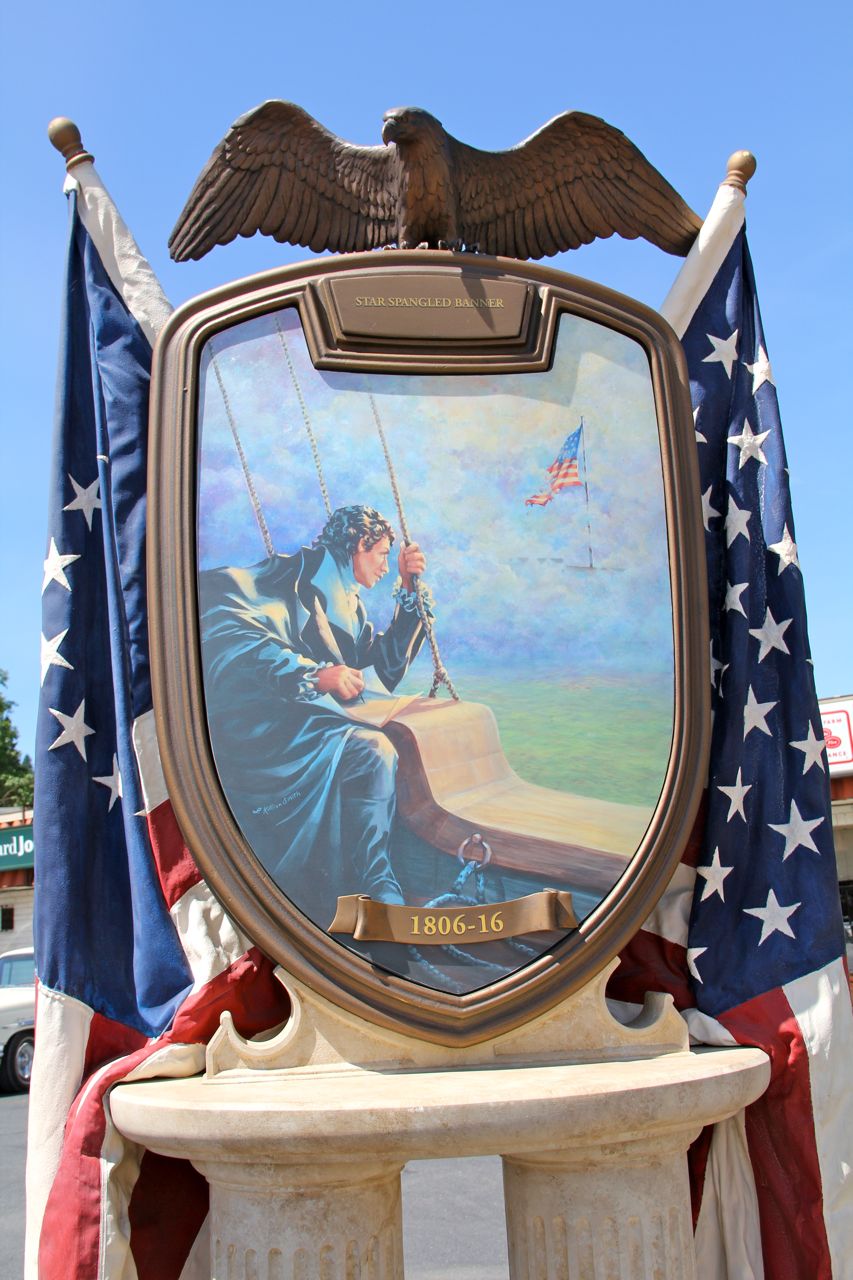
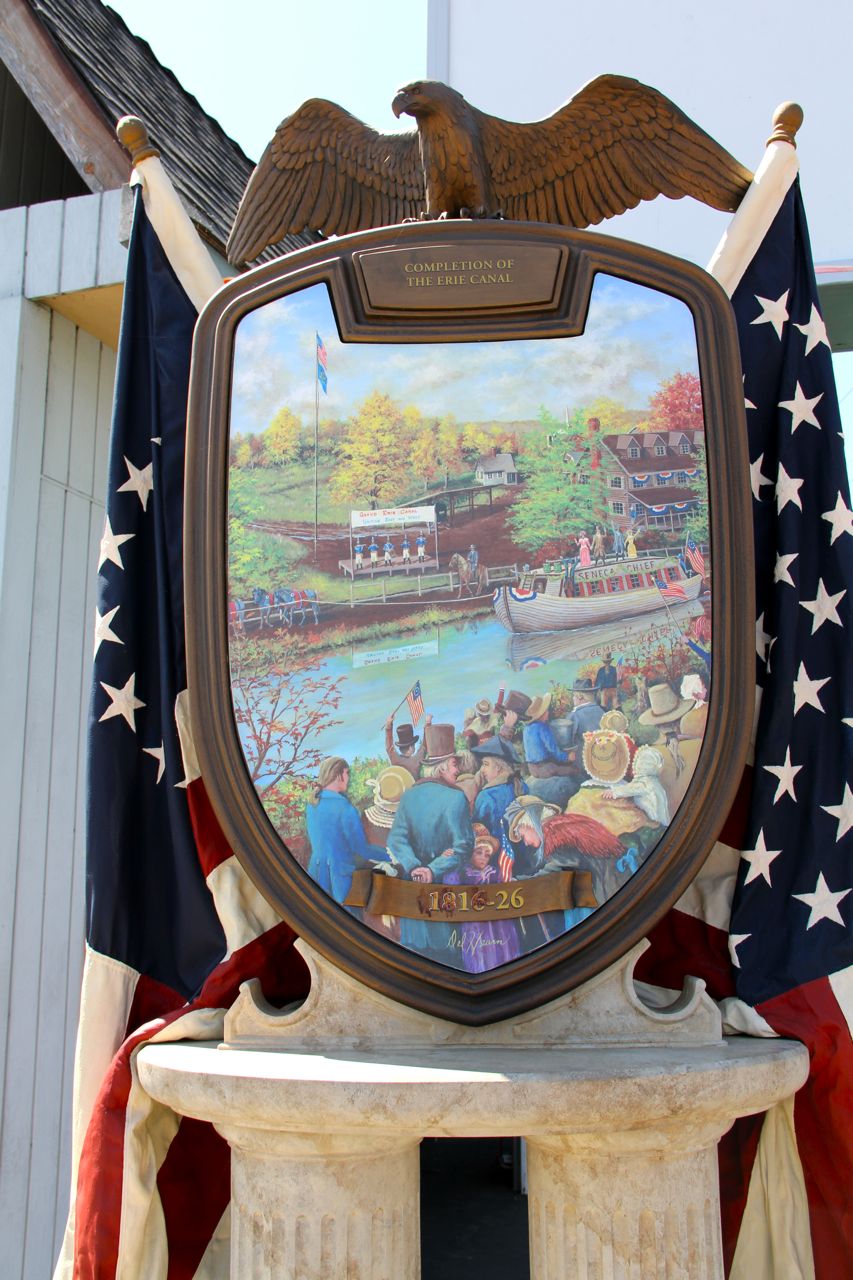

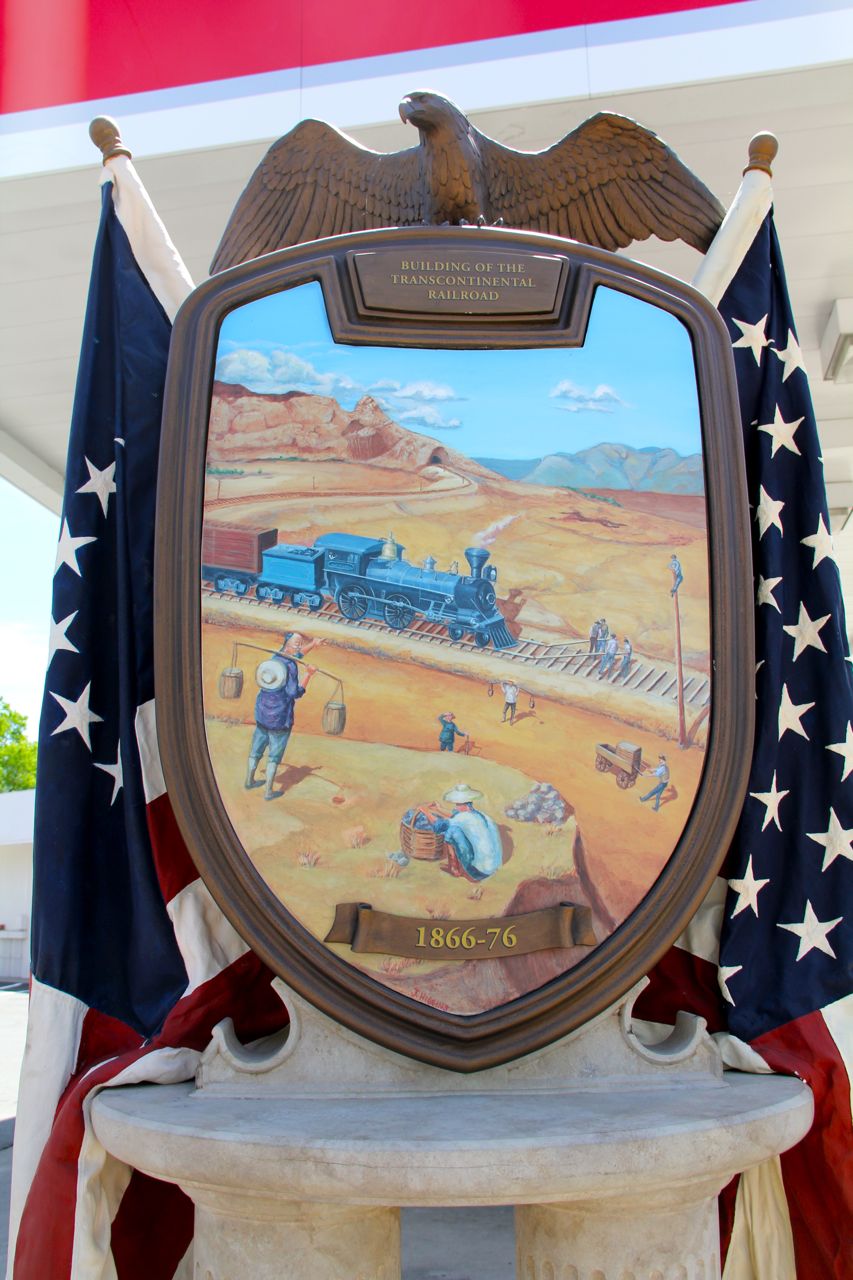
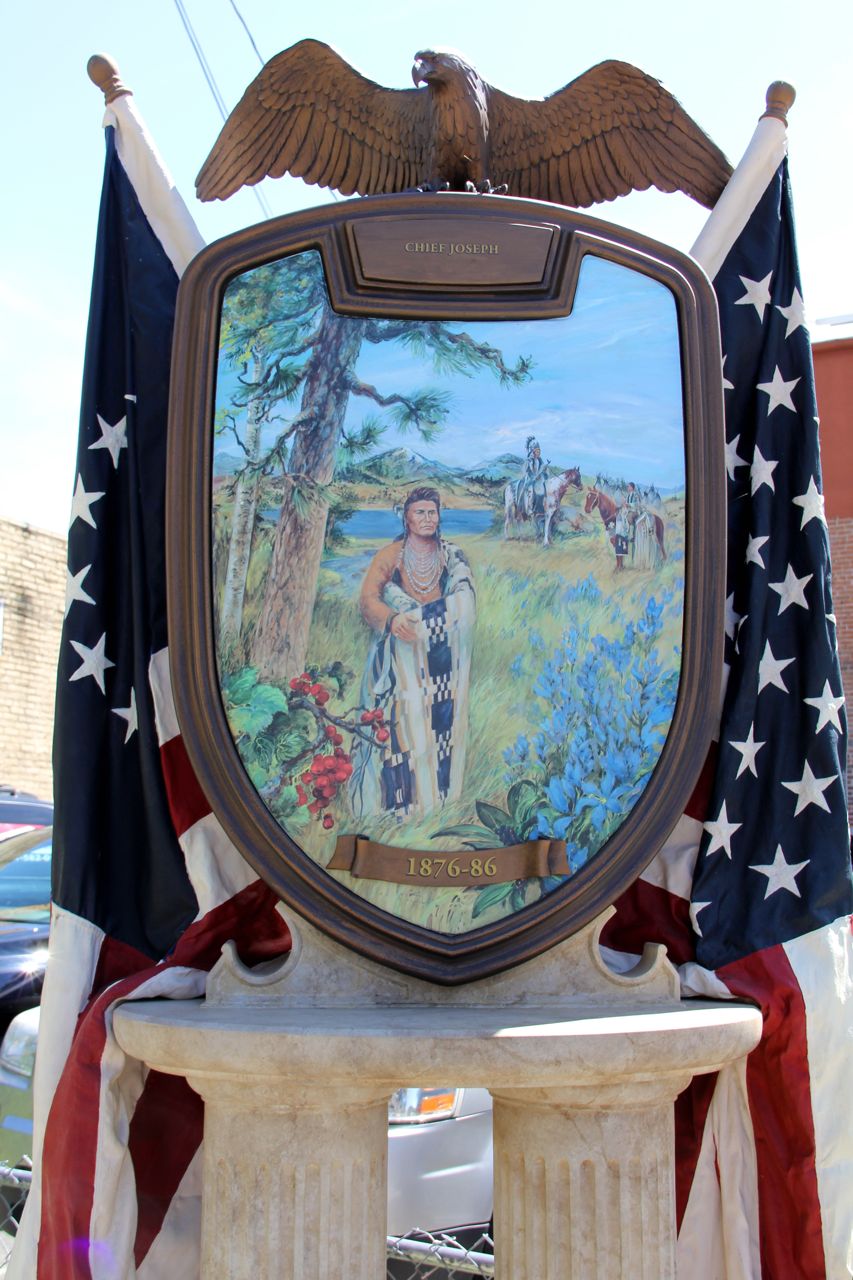
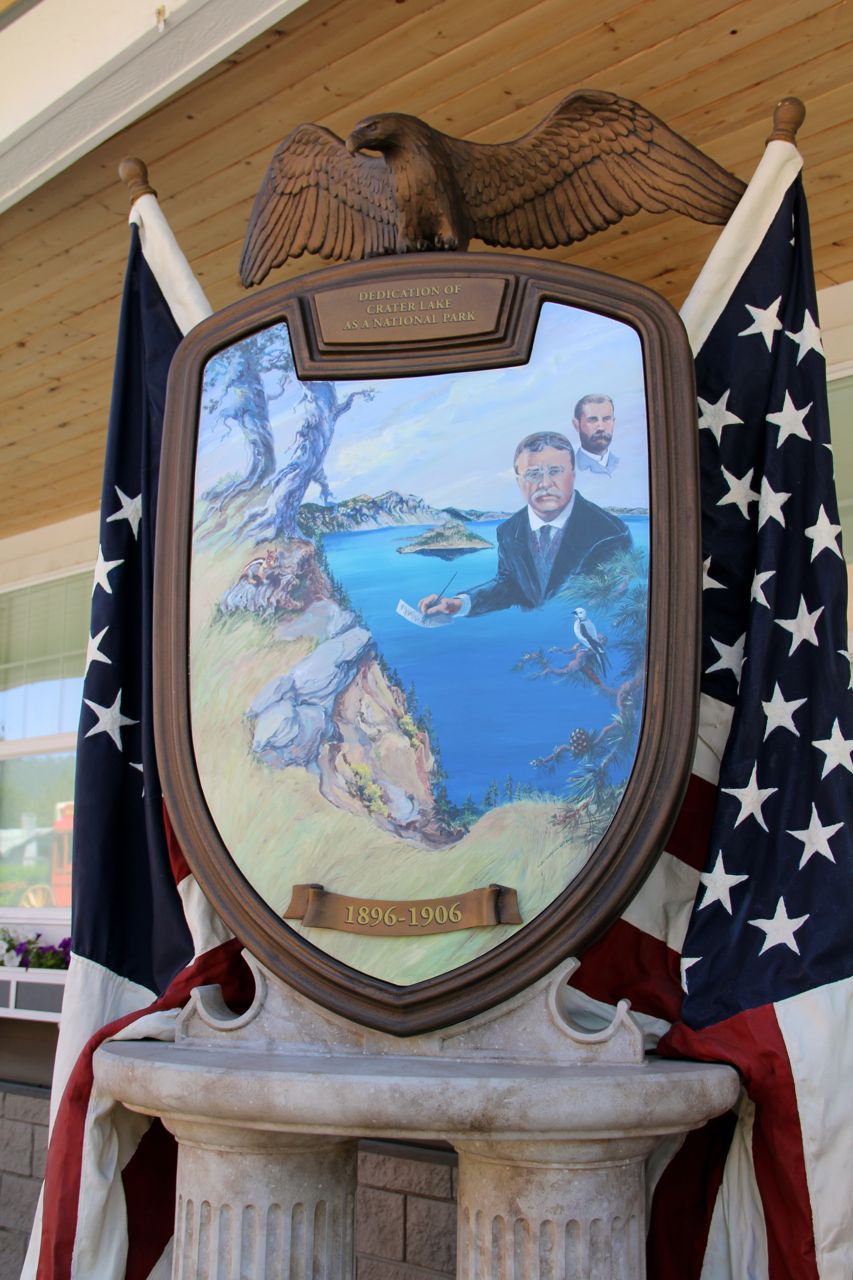

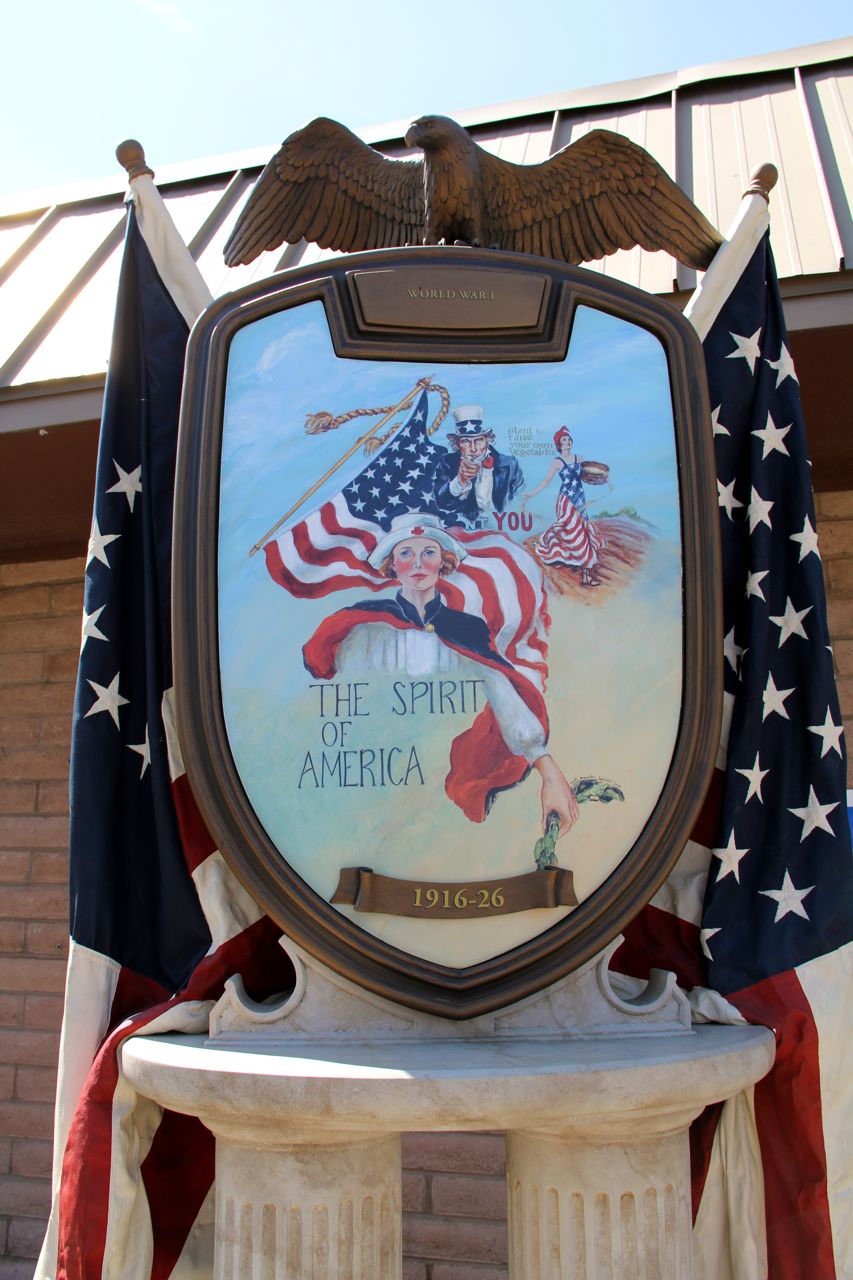
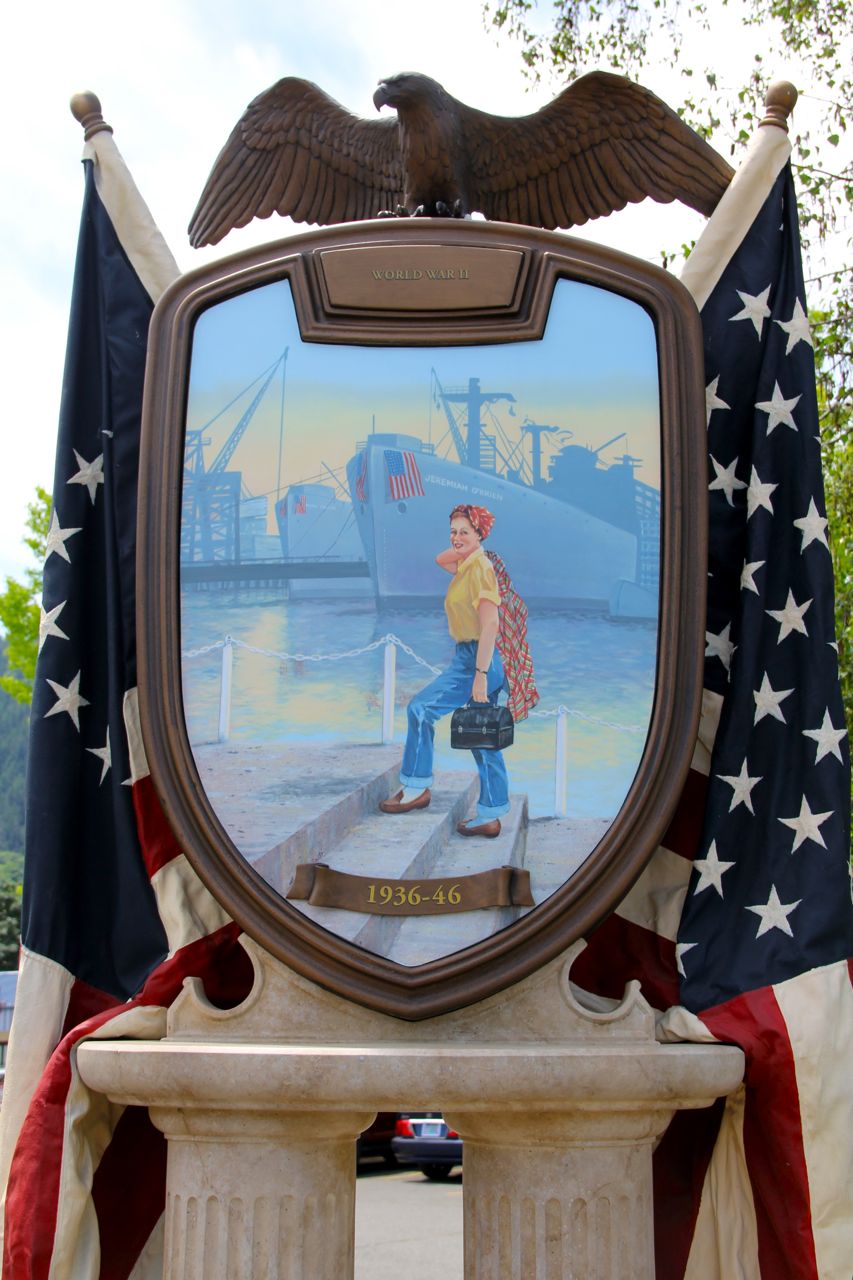
In addition to the monuments, several Bald Eagles swooped down and perched on the sidewalks!
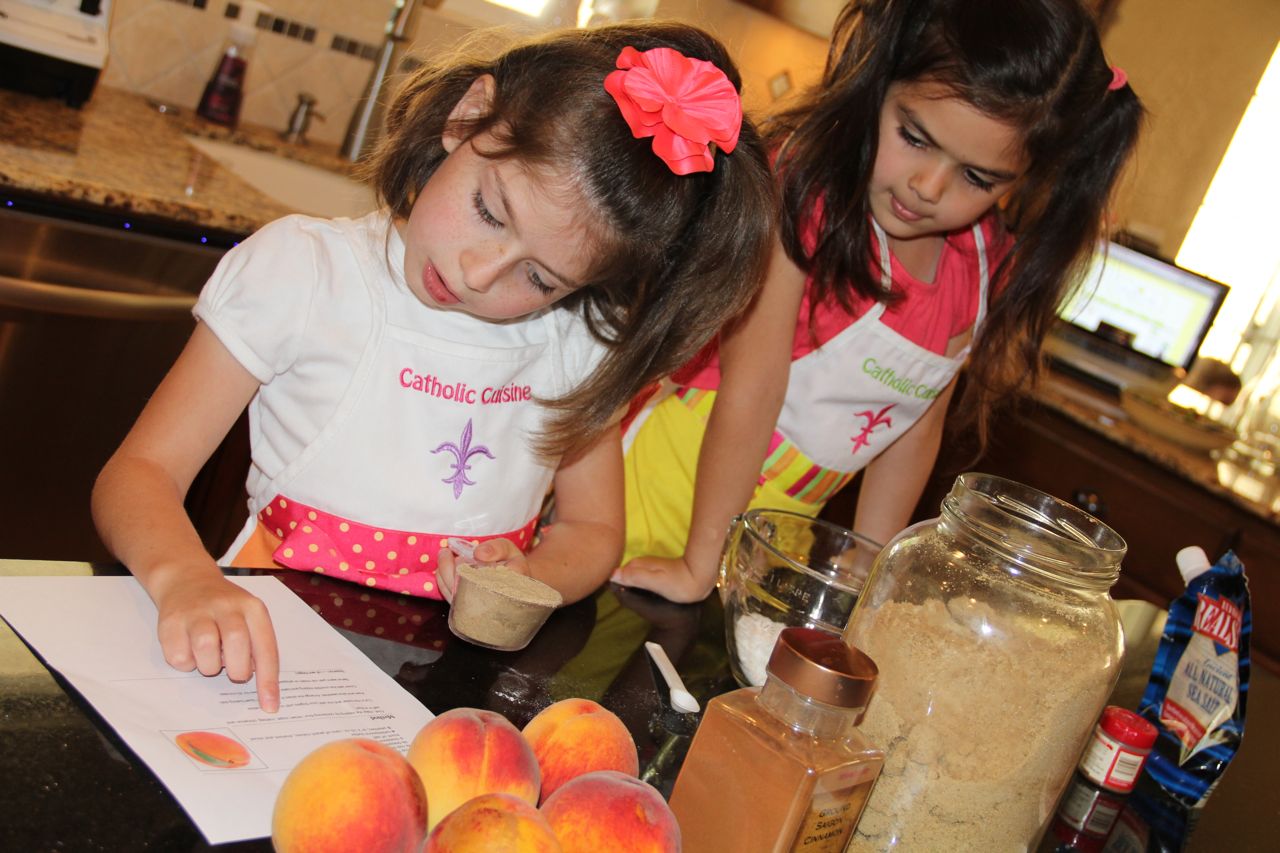
Canning Peaches with my Girls
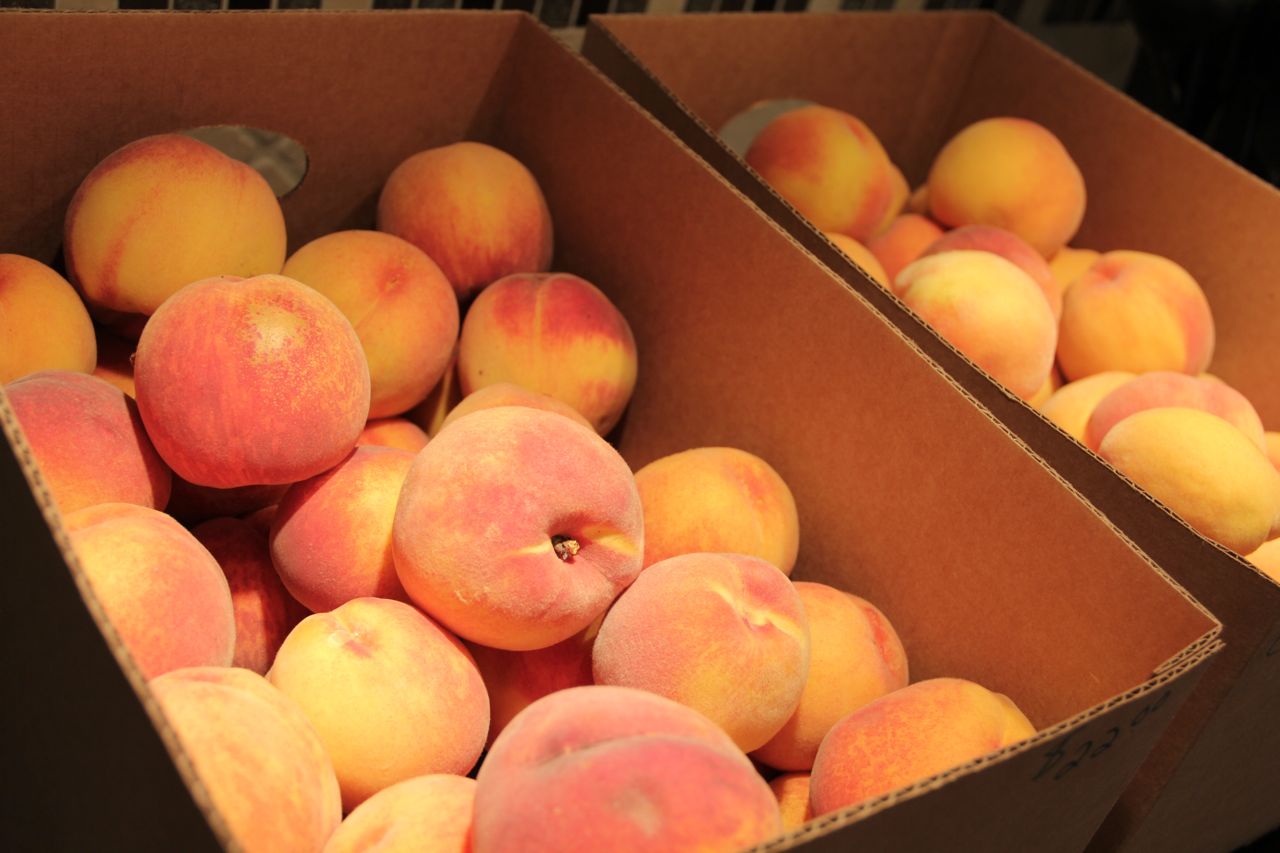
It has been over 8 years since the last time I attempted canning peaches… Or canning anything for that matter! It was the end of August in 2003… I had three full cases of ripe peaches to deal with as soon as possible… I was full term with Twinkle Toes (who was due on September 9th and born on August 30th)… I was working full time trying to transition my customers over to the new company that had recently purchased my business so that I could be a stay-at-home mom… I had only 3 coil burners that worked in my old tiny kithcen… And my only two “helpers” were barely 3 and 1 1/2 years old at the time! I said NEVER AGAIN!!
Well, on my way home from picking up those closet organizers, I stopped by the peach orchard to get some fresh peaches for my girls state study, and ended up purchasing two cases of peaches – a case of Sweet Sue Peaches to eat and a case of Elberta Peaches for canning. I’m not sure what made me make that decision, but it seemed like a good idea at the moment. I did save all those canning supplies, after all! 🙂
Actually, it was quite a different experience this time around… The girls and I really enjoyed our afternoon in the kitchen, and I had fun teaching them all about blanching and canning!
1. We started by putting our jars and rings into a dishwasher on the sterilize setting (last time I had to boil my jars… I LOVE having a dishwasher!!) and then left them in the dishwasher until we were ready to use them, so that they would stay hot.
2. Place the lids in a small saucepan and heat to a simmer, but don’t boil.
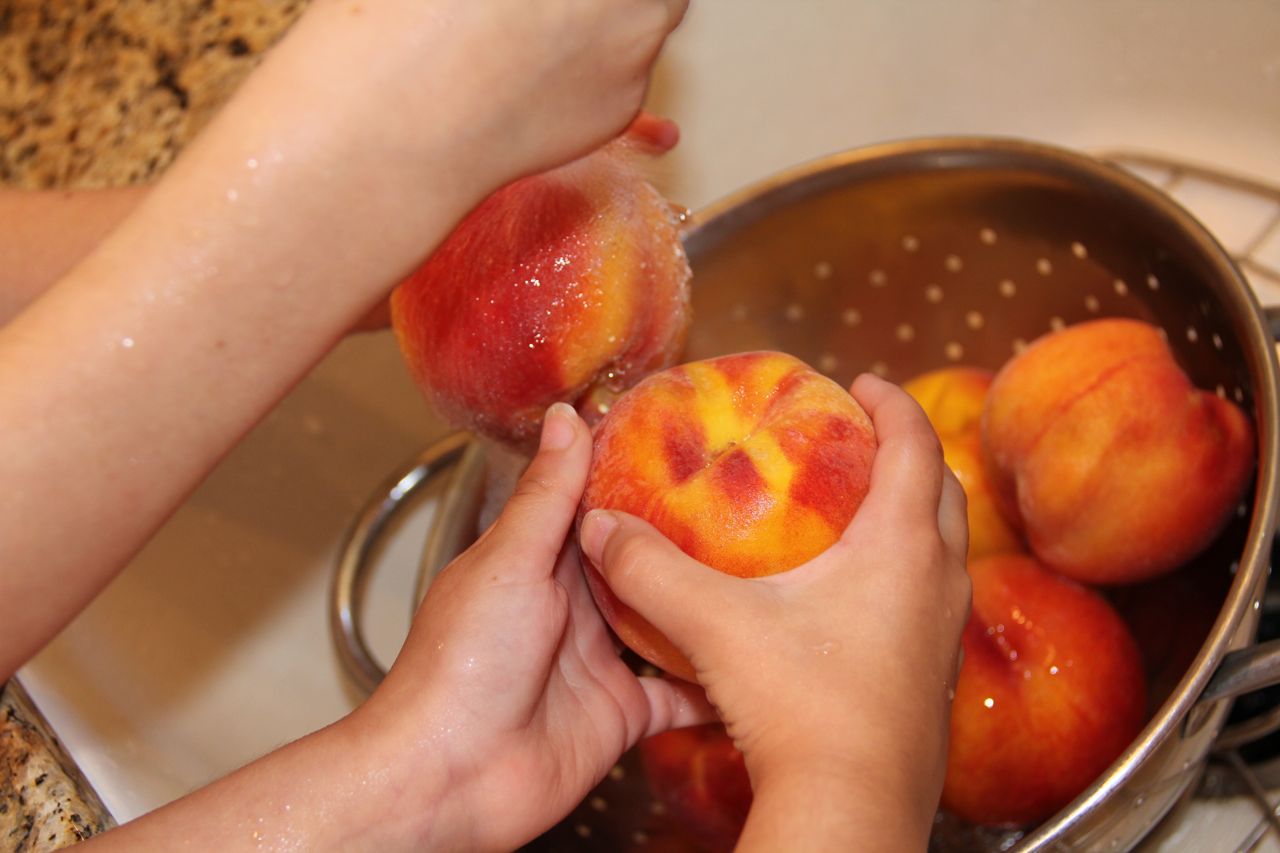
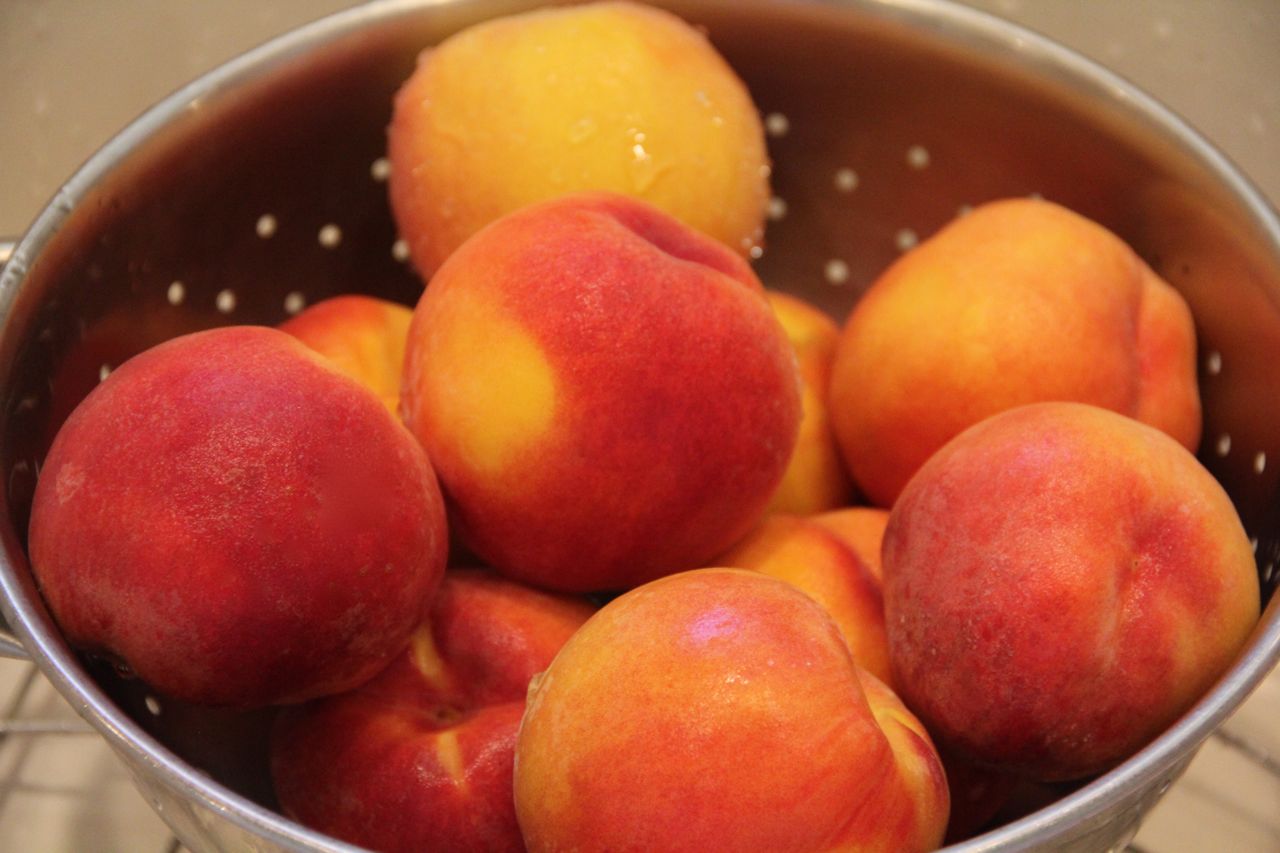
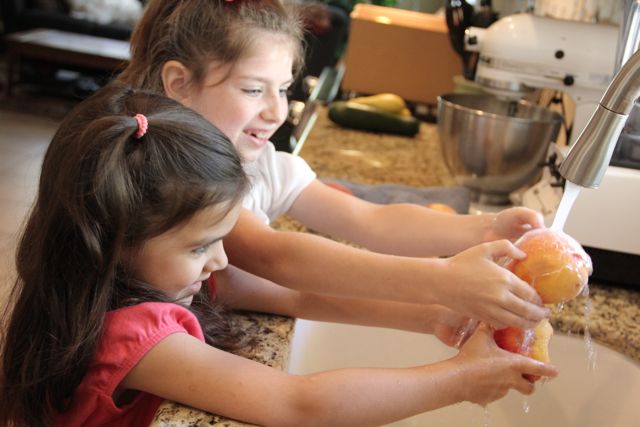
3. Wash the peaches by rinsing in a colander.

4. Place the peaches into a pot of boiling water and blanch for 30 to 60 seconds.
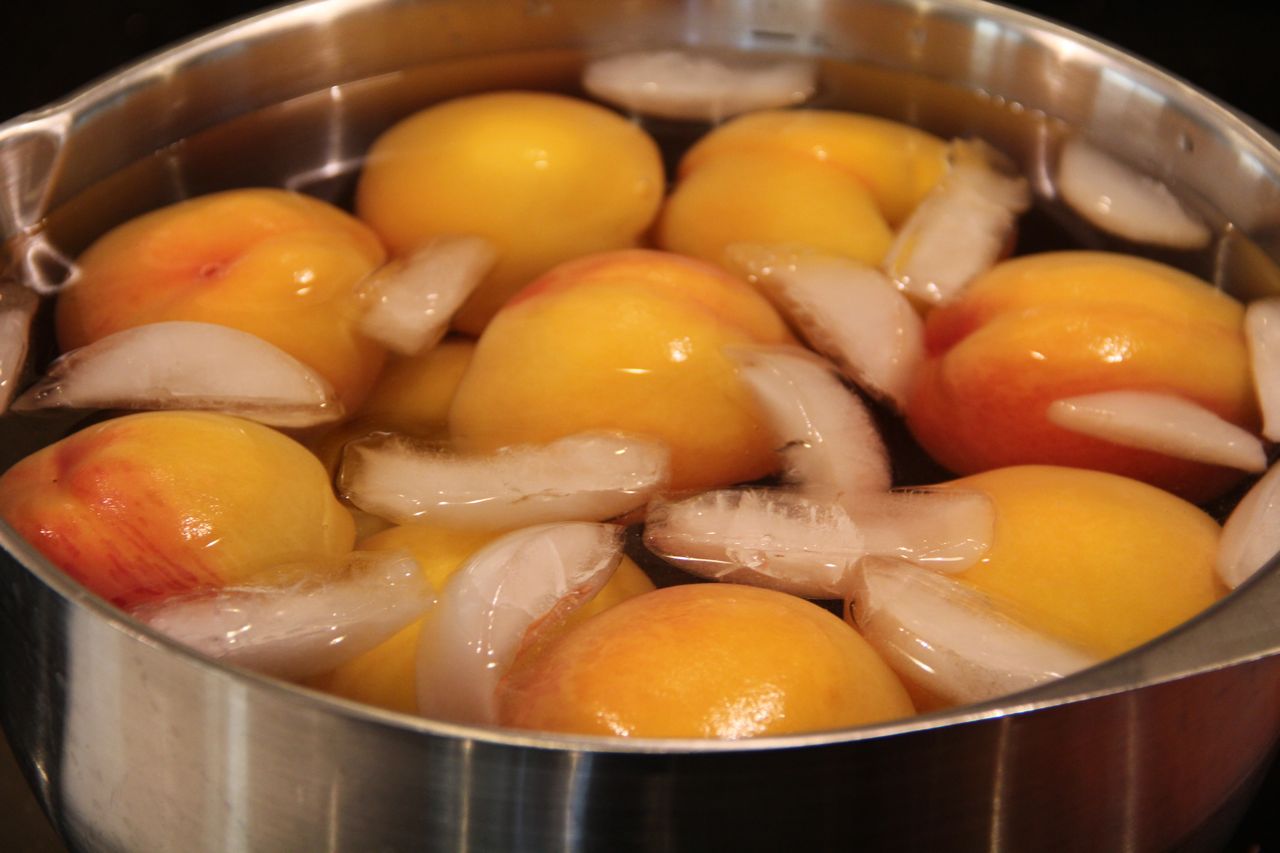
5. After blanching, place them into a ice water bath to keep them from cooking.
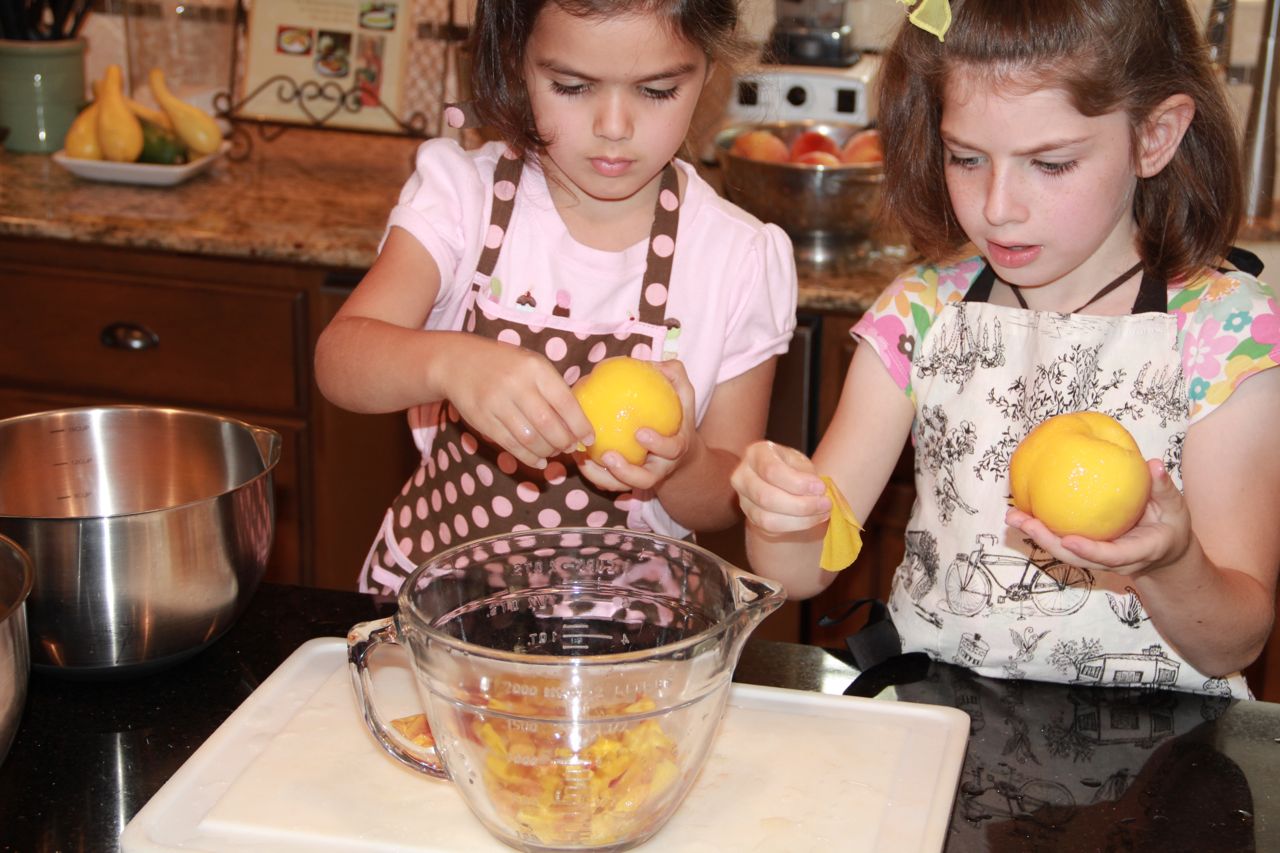
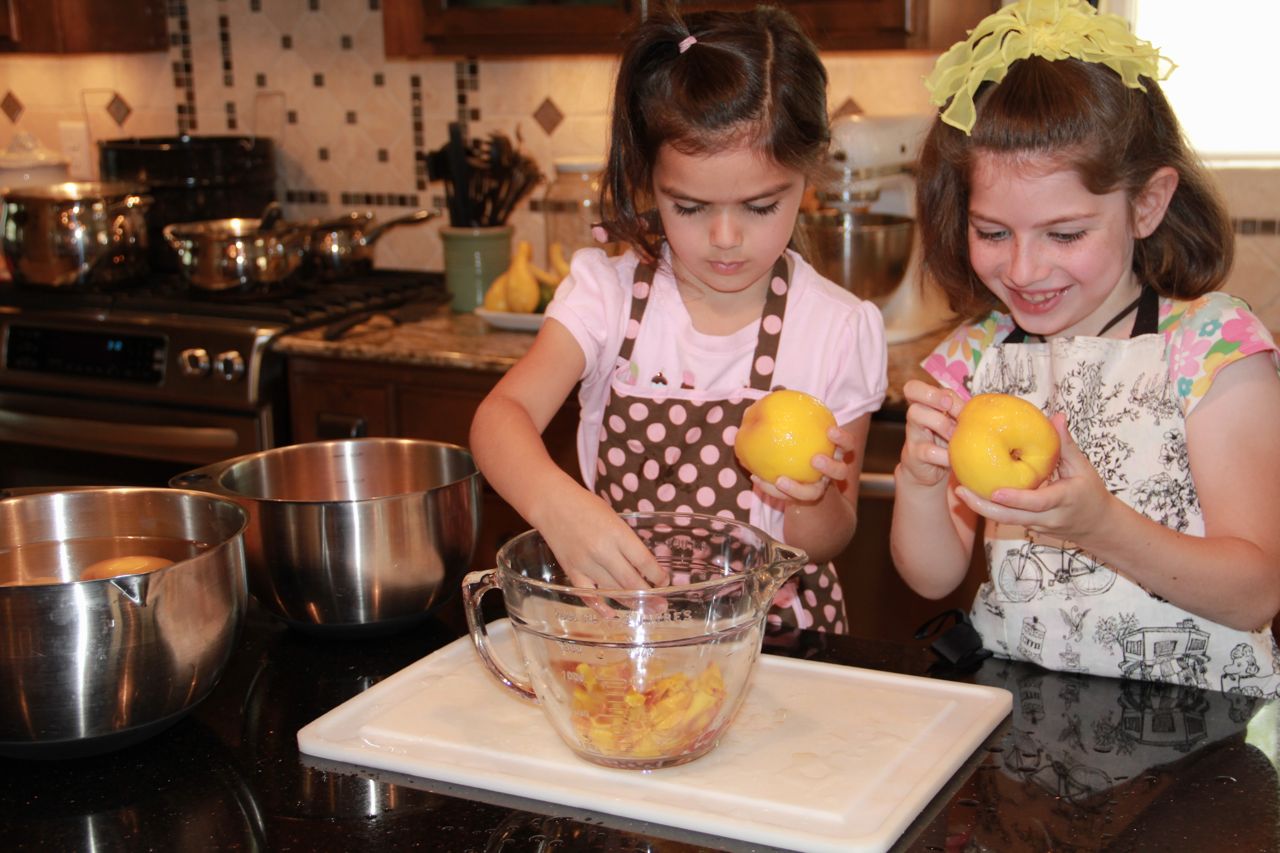
6. Remove skin from peaches. This was the girls’ favorite step… They loved seeing the skins just slip right off, without needing a knife or anything.
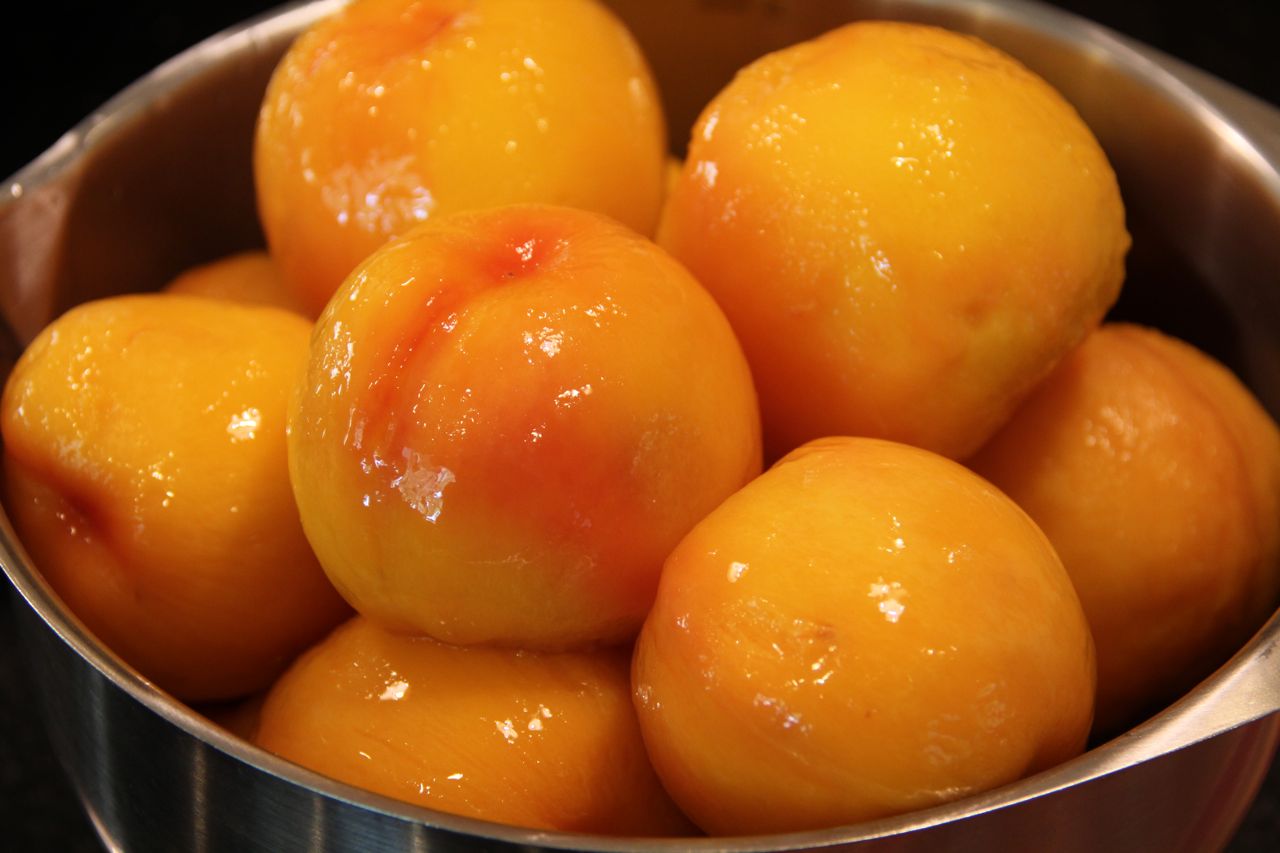
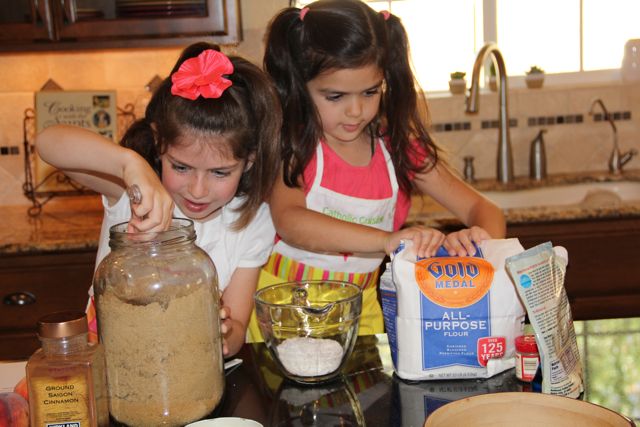
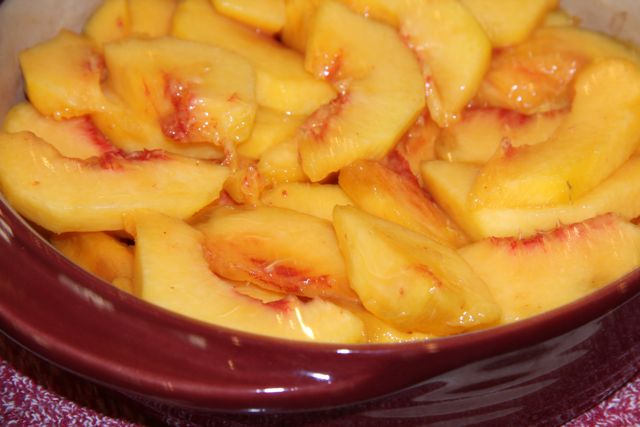
7. We decided to quarter our peaches. (At this point you can use lemon juice or fruit fresh to keep the peaches from turning brown, but since we didn’t have either we just hurried!)
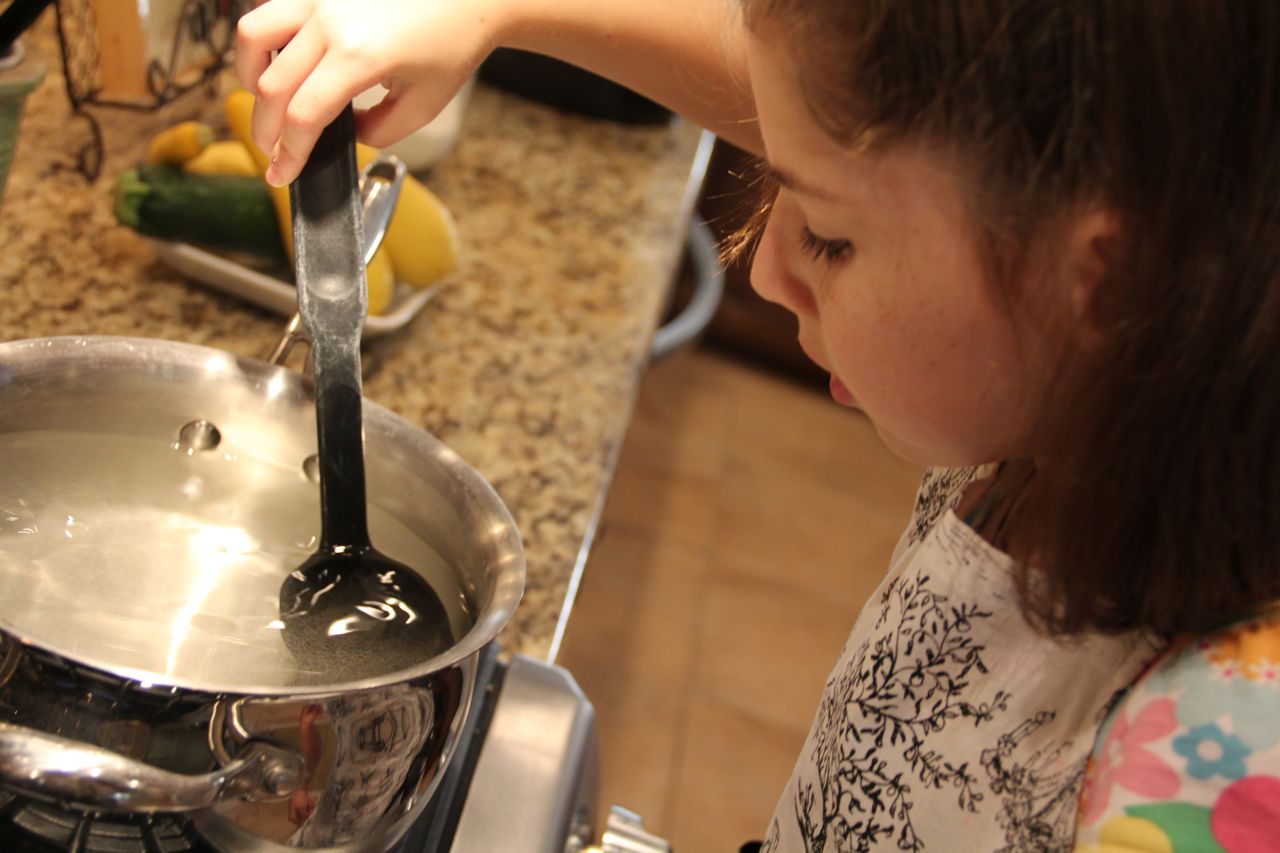
8. Make a syrup. We made a very light syrup by bringing 9 cups of water and 2 1/2 cups of sugar to a boil in a medium saucepan. Twinkle Toes requested this job.
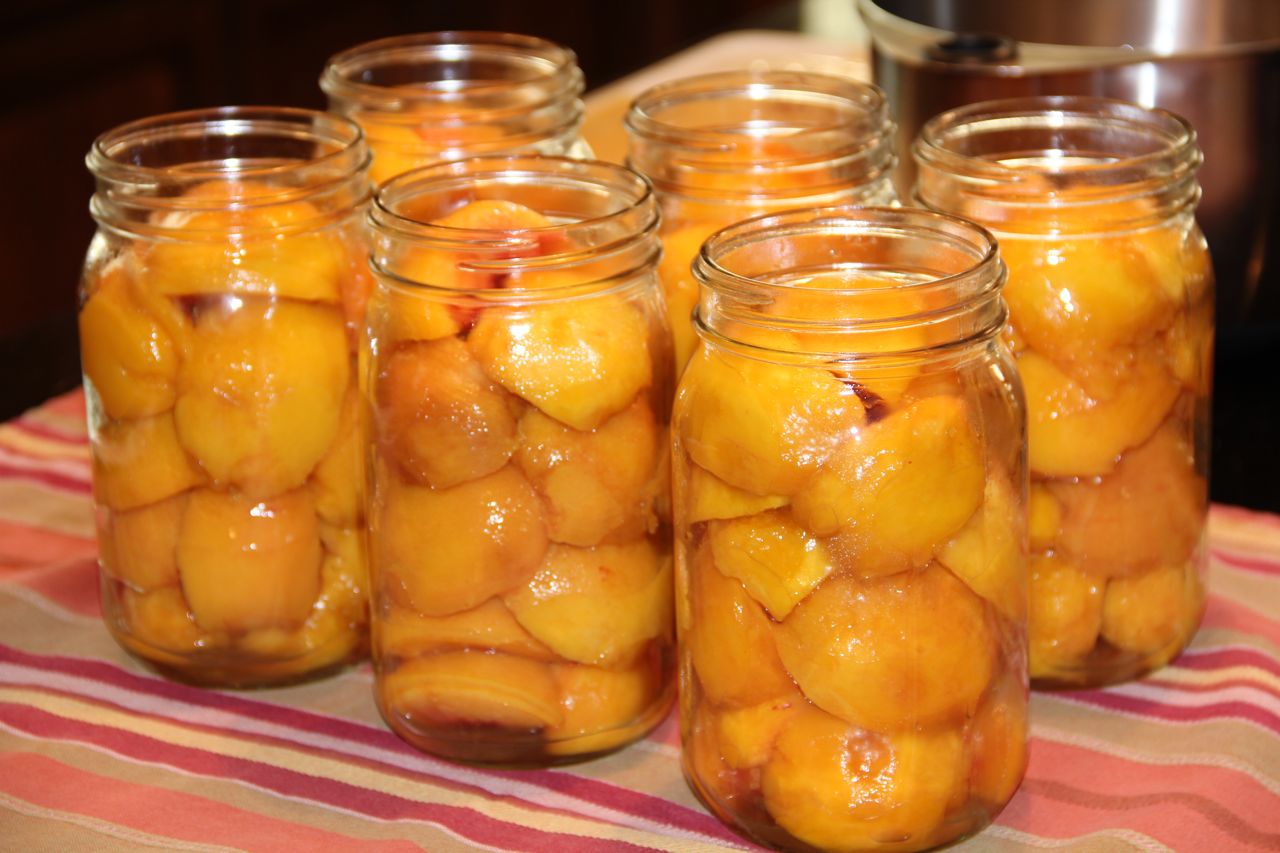
9. Using the Cold Pack Method… Place peaches face (pit side) down in the hot and sterilized bottles, packing them fairly tightly, without squishing them, so they aren’t as likely to float.
10. Carefully pour the hot syrup into the bottles until the peaches are covered, leaving exactly 1/2 inch of space at the top of the bottle.
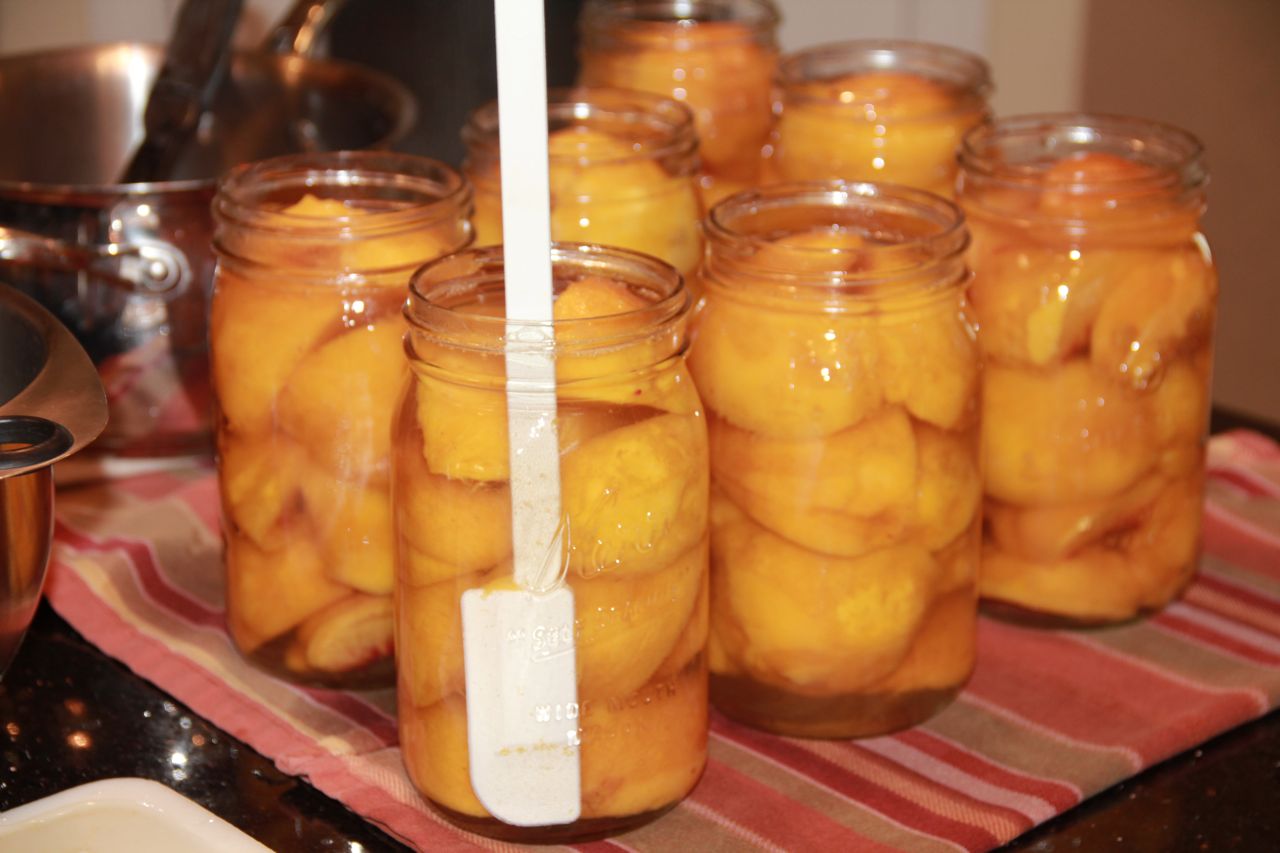
11. Using a small spatula or butter knife, slide it down each side of the bottle to remove any air bubbles.
12. Wipe rim and screw threads with a clean damp cloth. Add lid, screw band and tighten firmly and evenly. Do not over tighten.
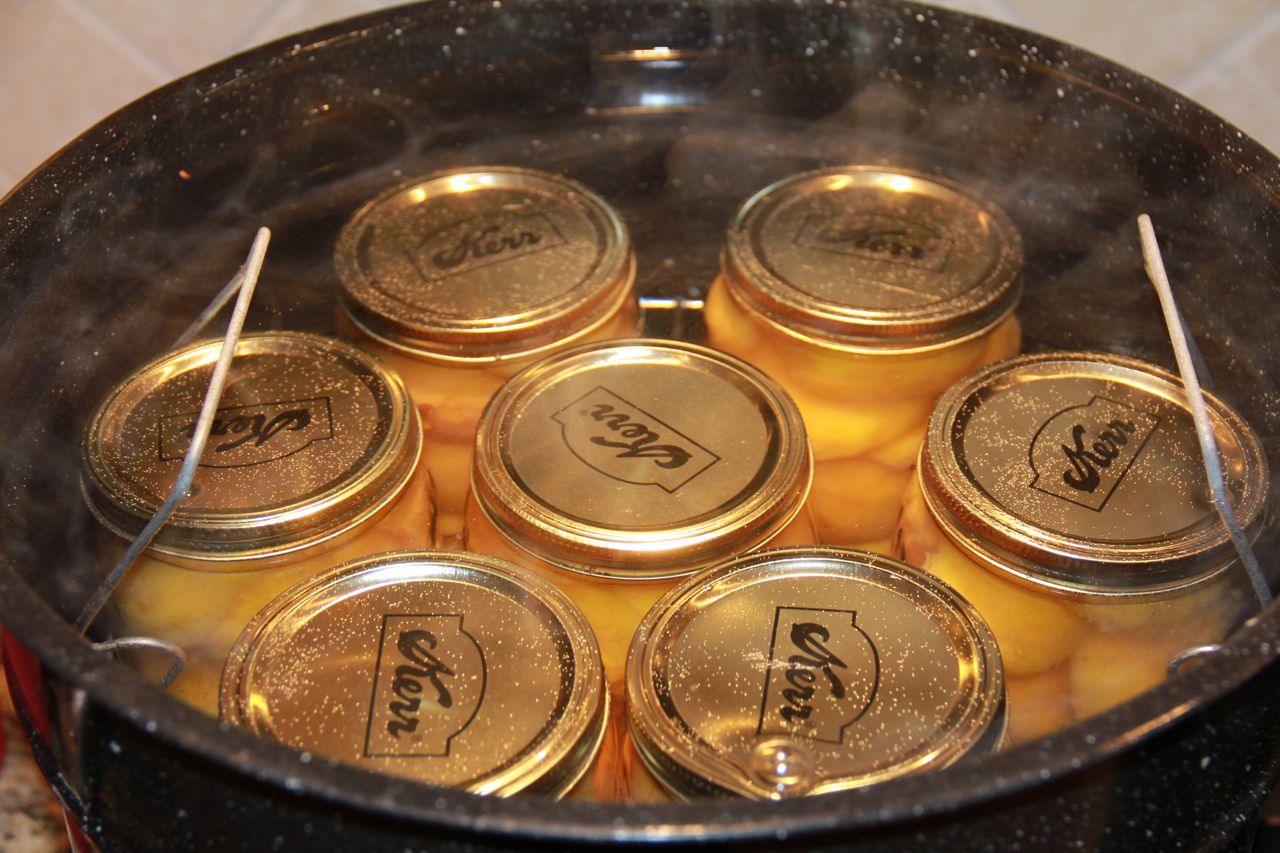
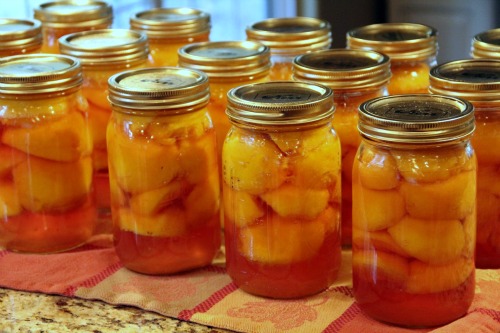
13. Place the jars into the rack of the canner. (Remember to place every other bottle across from each other so you don’t tip the rack over.) The water in the canner can be pretty warm, but not at a boil when you put your jars in, or you’ll break a jar. The jars need to be covered with at least one inch of water. You want your jars covered with about an inch of water. Turn the heat to the highest setting, and set the timer once the water reaches a vigorous boil. Using the time table below we processed our peaches for 35 minutes.

14. Once the jars have processed, carefully lift them out of the water and place them on a towel to cool – without touching or bumping them – leaving about an inch in-between the jars. Once the jars are cool, you can check that they are sealed – verifying that the lid has been sucked down – by pressing gently in the center with your finger. If it pops up and down (often making a popping sound), it is not sealed. (All but one of ours sealed… We’ll eat that jar tomorrow with some cottage cheese, one of my children’s favorite snacks.)
Notes: If fruit is not covered by liquid it may darken during storage (but does not necessarily mean it is spoiled, as all fruits will darken somewhat).
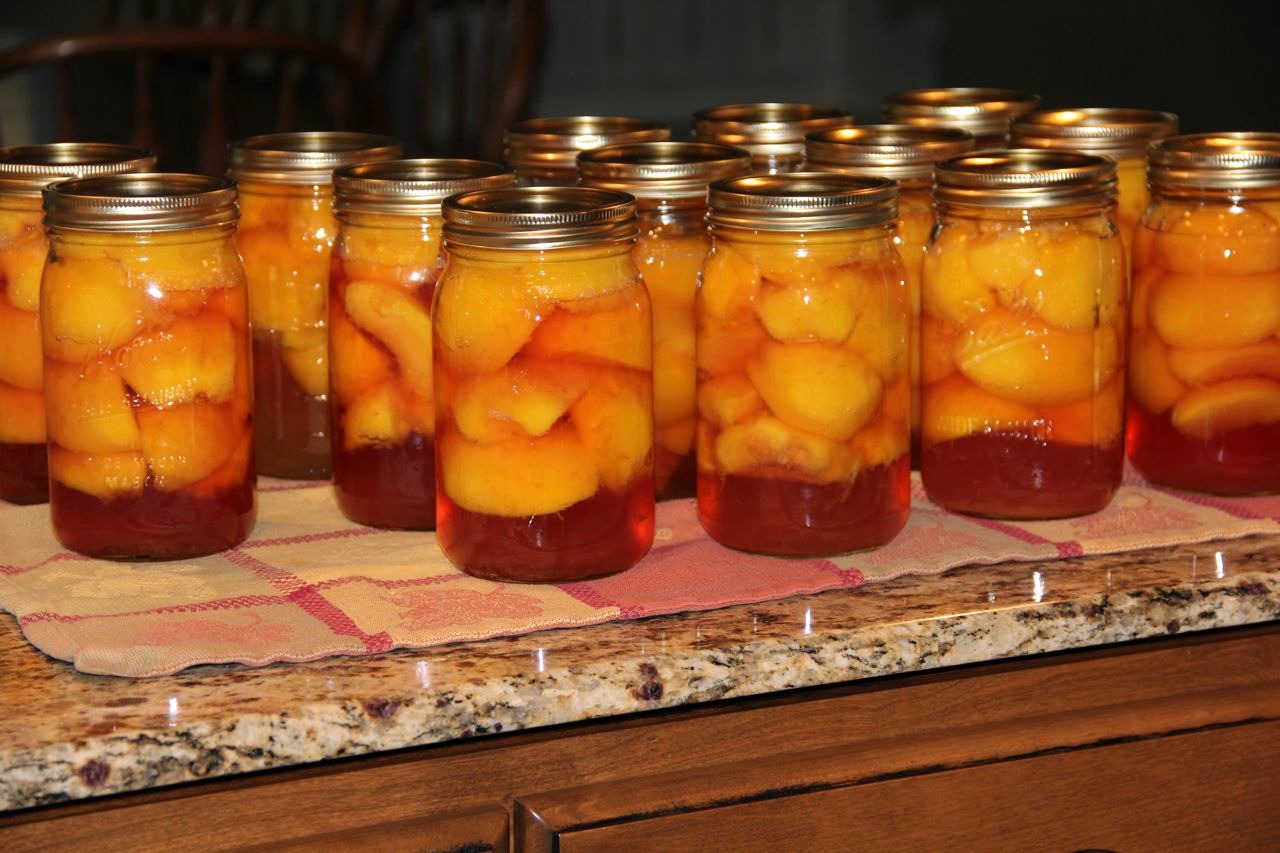
We ended up with 14 quarts of peaches, and we still have about a half of a case of the Sweet Sue peaches left. I think that I may freeze some of them for smoothies and maybe make a Stone Fruit Tea Cake, to welcome Hubby home next weekend, but if any of you have a favorite peach recipe to share, I’d love some suggestions!
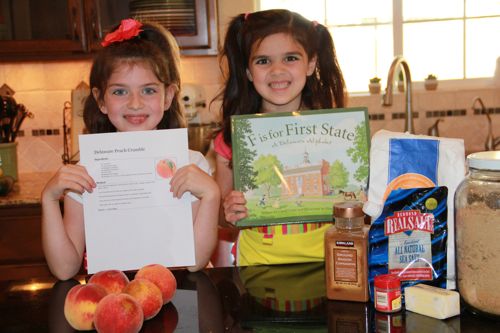
State-by-State Baking :: Delaware Peach Crumble
My boys have very slowly been scrapbooking their way through the 50 States. Since we are now focusing on American History I am hoping that they will be able to make much more progress this year, and perhaps finish the study. Now that the girls are a little older, they will also be joining the fun, and hopefully catching up to the boys soon, so we can study each state all together.
Like the boys, the girls will also be reading the Discover America State by State Books and completing some of the Student Activities.
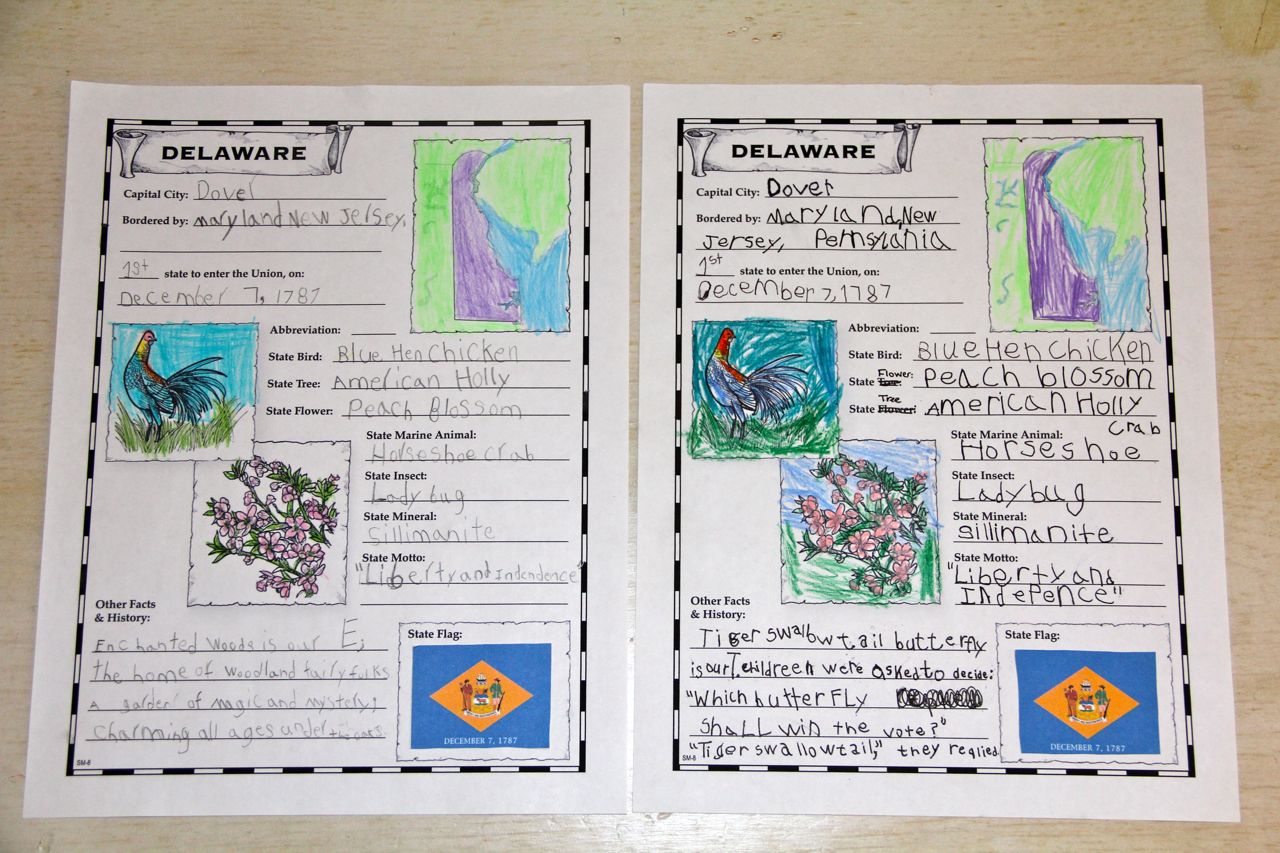
Unlike the boys, the girls will be taking a slightly different approach, completing simple Notebook Pages for each state (after reading and studying the Alphabet Book) and then spending some time in the kitchen preparing a recipe (or two) that tie in to each particular state in some way. They are very excited and just completed their study of Delaware this week!
by Twinkle Toes (L) and Chiquita (R)
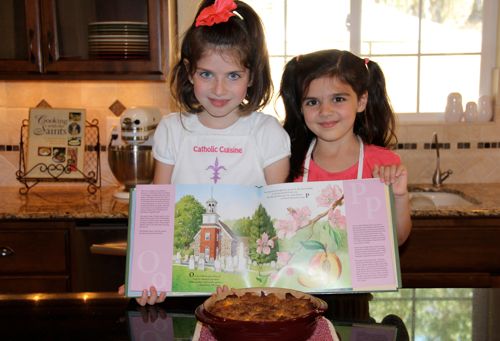

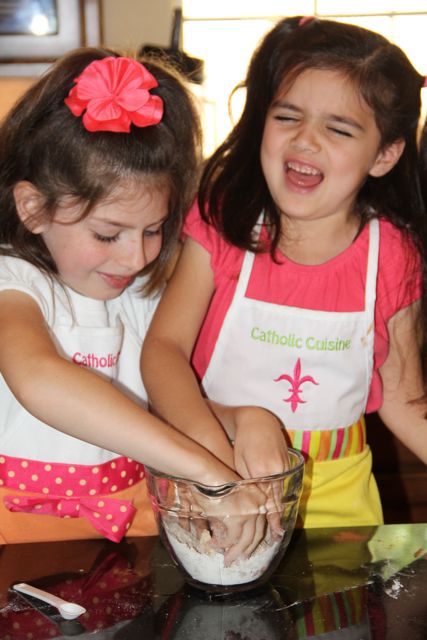
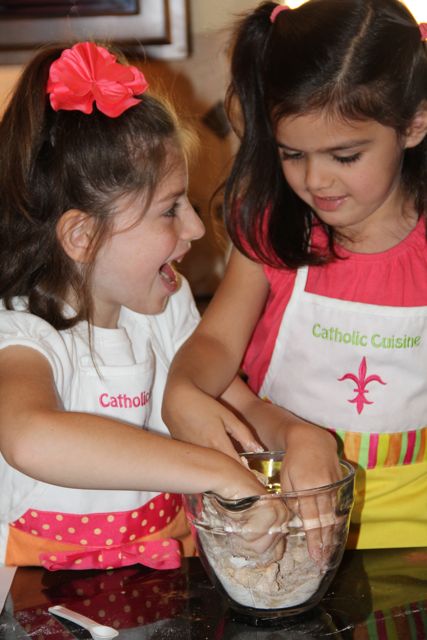
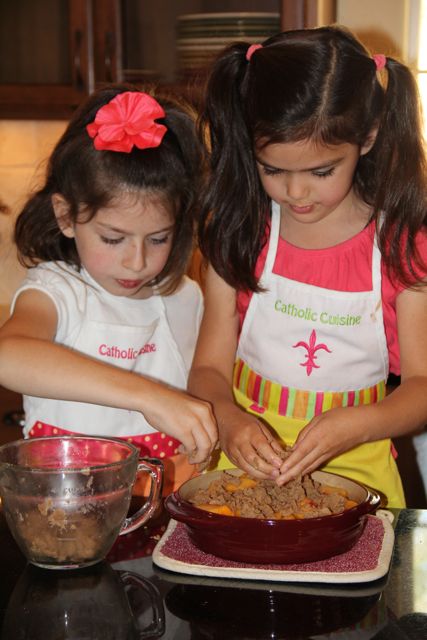

The Peach Crumble sure didn’t last long, but it was such a fun way to end our school week!
Other Posts of Interest:
State-by-State Scrapbook
State-by-State Scrapbook :: Delaware
P.S. Is there anyone out there from Delaware that would be willing to send my kiddos a Delaware postcard? If so please send an email to jessica.showerofroses(at)gmail(dot)com. If you have children studying the states, we’d gladly return the favor with a postcard from our state!


0 Comments